Love this? Save it for later!
Share the inspiration with your friends
Last Friday night, my kitchen was a mess — flour dusted the counters, a cracked mixing bowl sat abandoned, and I was juggling two timers while my phone buzzed nonstop. Honestly, I wasn’t planning to invent anything fancy, just a quick brownie fix. But then, as I absentmindedly grabbed my cream cheese instead of butter, this luscious idea sparked. What if I swirled together the rich, fudgy depth of brownies with the velvety creaminess of cheesecake and a pop of that classic red velvet charm? The first bite was a surprise: creamy marbling that melted on my tongue, a perfect balance of tang and chocolatey sweetness. Maybe you’ve been there—staring at your pantry, hoping for something comforting yet exciting.
The way the red velvet streaks blurred into the cheesecake swirls reminded me of those dreamy watercolor paintings I once tried and failed to replicate. It felt like a happy accident, the kind of recipe that starts off chaotic and ends with something unforgettable. I’ll admit, I forgot to set the oven timer once (don’t judge), but even with that little hiccup, these brownies came out perfectly fudgy and beautifully marbled. Every time I make these Fudgy Red Velvet Cheesecake Swirl Brownies with Creamy Marbling, I’m reminded why I keep experimenting in the kitchen—the magic of unexpected combinations that just work. Let me tell you, this recipe has become my go-to when I want to impress friends without the fuss. You might just find yourself making these more than once, too.
Why You’ll Love This Recipe
This recipe isn’t your typical brownie—it’s a deliciously rich duet of flavors and textures that I’ve tested dozens of times to get just right. Whether you’re a cheesecake lover or a red velvet fanatic, these brownies bring the best of both worlds in every bite.
- Quick & Easy: Comes together in under an hour, perfect when you want something impressive but don’t have all day.
- Simple Ingredients: No exotic items here—just pantry staples and a few fresh ingredients you can find at any grocery store.
- Perfect for Celebrations: Great for Valentine’s Day, birthdays, or just those moments when you want a little indulgence.
- Crowd-Pleaser: Always gets rave reviews, from kids who love the creamy texture to adults who appreciate the balanced flavor.
- Unbelievably Delicious: The fudgy brownie base contrasts beautifully with the tangy, smooth cheesecake swirl infused with that iconic red velvet flavor.
What sets this apart? It’s the creamy marbling technique that gives each piece a one-of-a-kind look and texture. I use a gentle folding method to keep the swirls distinct without overmixing, preserving that gorgeous contrast that’s as delightful to look at as it is to eat. This isn’t just another brownie recipe—it’s the one where you close your eyes and savor every bite.
What Ingredients You Will Need
This recipe uses simple, wholesome ingredients to deliver bold flavor and satisfying texture without the fuss. Most of these are pantry staples, and you might already have them on hand, making it super accessible for spontaneous baking sessions.
- For the Brownie Base:
- Unsweetened cocoa powder (1/2 cup / 50 g) – I prefer Ghirardelli for deep, rich flavor
- All-purpose flour (1 cup / 120 g)
- Granulated sugar (1 cup / 200 g)
- Unsalted butter (1/2 cup / 115 g), melted and slightly cooled
- Large eggs (2), room temperature
- Pure vanilla extract (1 tsp)
- Salt (1/4 tsp)
- For the Cheesecake Swirl:
- Cream cheese (8 oz / 225 g), softened – I find Philadelphia brand gives the smoothest texture
- Granulated sugar (1/3 cup / 65 g)
- Large egg (1), room temperature
- Pure vanilla extract (1/2 tsp)
- Red food coloring (1 tbsp) – gel-based for vibrant color without extra liquid
- All-purpose flour (1 tbsp / 8 g)
Substitutions: For a gluten-free option, swap the all-purpose flour with a 1:1 gluten-free baking flour. If you prefer dairy-free, coconut cream cheese and vegan butter work well but expect a slight texture difference. And if you don’t have red food coloring, beet juice powder or pomegranate juice can add a natural tint, though the color will be less intense.
Equipment Needed
- 8×8 inch (20×20 cm) square baking pan – I use a non-stick metal pan for easy release; glass works too but may require slightly longer baking time.
- Mixing bowls – at least two, one for brownie batter and one for cheesecake mixture.
- Hand mixer or stand mixer – for whipping the cream cheese mixture smooth and lump-free.
- Rubber spatula – essential for folding ingredients gently and scraping down the bowls.
- Measuring cups and spoons – accurate measuring is key for consistent results.
- Toothpick or skewer – perfect for creating the creamy marbling swirl effect.
If you don’t have a stand mixer, a hand mixer or even a sturdy whisk will do, though it might take a bit longer to get the cheesecake mixture silky smooth. For budget-friendly baking, a silicone spatula and glass bowls work wonders and are easy to clean.
Preparation Method
- Preheat Oven and Prepare Pan: Set your oven to 325°F (165°C). Line your 8×8 inch pan with parchment paper, leaving some overhang for easy removal later. This step saves you from brownie breakage when you cut.
- Make the Brownie Batter: In a medium bowl, whisk together the cocoa powder, flour, sugar, and salt until evenly combined. In another bowl, beat the melted butter, eggs, and vanilla extract until smooth (about 1-2 minutes). Gradually add the dry ingredients to the wet, folding gently with a spatula until just combined. The batter should be thick and fudgy—don’t overmix or brownies might turn cakey.
- Prepare the Cheesecake Swirl: Using a hand or stand mixer, beat the softened cream cheese until smooth and creamy (about 2-3 minutes). Add sugar, egg, vanilla, and red food coloring, then beat again until fully incorporated. Sprinkle in the flour and mix just until combined to prevent a gummy texture.
- Assemble the Layers: Pour half of the brownie batter into your prepared pan and spread evenly. Dollop half of the cheesecake mixture on top in spoonfuls. Repeat with remaining brownie batter and cheesecake dollops. This layering creates that stunning marbling effect.
- Create the Marbling: Take a toothpick or skewer and drag it through the batter in swirling motions, making figure-eights or zig-zags to blend the two mixtures but keeping them distinct. Don’t overdo it—less is more for that creamy marbling look.
- Bake: Place the pan in the oven and bake for 40-45 minutes. The edges should be set but the center will still jiggle slightly—this ensures fudgy brownies. If you prefer a firmer texture, add 3-5 more minutes but watch closely to avoid drying out.
- Cool and Serve: Let the brownies cool completely in the pan on a wire rack (about 1 hour). Chilling in the fridge for 2 hours helps the cheesecake swirl set and makes cutting cleaner. Use the parchment overhang to lift brownies out before slicing.
Quick tip: If your cream cheese isn’t soft enough, microwave it for 10 seconds at a time. Also, resist the urge to open the oven door during the first 30 minutes to keep the temperature steady and prevent cracks.
Cooking Tips & Techniques
Let me share some tricks I picked up after a few too many failed batches. First, room temperature eggs and cream cheese are game changers—they blend way easier and lead to a smoother texture.
When mixing the brownie batter, folding gently is key. Overmixing activates gluten and makes brownies tough instead of fudgy. I like to stop as soon as I see no flour streaks.
The marbling step might seem intimidating, but it’s really about light, confident swirls with your toothpick. I learned the hard way: too much swirling blends everything into a muddy mess. Keep your motions fluid and don’t overthink it.
Timing matters, too. Baking at 325°F (165°C) rather than higher temps lets the brownies cook evenly without drying out the cheesecake. And cooling fully before slicing helps maintain those clean, creamy layers.
Pro tip: If you want to multitask, whip the cheesecake mixture while the brownie batter rests—this saves time and keeps things moving smoothly. Also, using parchment paper really saved me from a crumbly disaster when removing the brownies.
Variations & Adaptations
These brownies are a fantastic base for creativity. Here are a few ways to switch things up:
- Vegan Version: Use dairy-free cream cheese and substitute eggs with flax eggs (1 tbsp ground flaxseed + 3 tbsp water per egg). Coconut oil can replace butter.
- Seasonal Twist: Add fresh or frozen raspberries to the cheesecake swirl for a fruity pop, or fold in mini chocolate chips for extra texture.
- Flavor Boost: Stir a teaspoon of espresso powder into the brownie batter to deepen the chocolate flavor without adding coffee taste.
- Gluten-Free: Swap all-purpose flour with almond flour or a gluten-free baking blend. The texture will be a tad different but still delicious.
- Personal Note: One time, I added a sprinkle of cinnamon in the cheesecake swirl, and it gave the brownies a subtle warmth that was unexpectedly delightful.
Serving & Storage Suggestions
These brownies are best served chilled or at room temperature to highlight that creamy marbling and fudgy texture. I like to slice them into small squares for parties—rich but totally worth it.
Pairing ideas? A scoop of vanilla ice cream or a drizzle of salted caramel sauce complements the tangy cheesecake and deep chocolate notes perfectly. For drinks, a cup of rich coffee or a glass of cold milk balances the indulgence beautifully.
Store leftovers in an airtight container in the fridge for up to 5 days. You can freeze them for up to 2 months—just thaw overnight in the fridge and warm slightly before serving. The flavors actually develop and meld nicely over a day or two, making them even better the next day.
Nutritional Information & Benefits
Each serving of these Fudgy Red Velvet Cheesecake Swirl Brownies packs roughly 280-320 calories, depending on portion size. They’re a treat, but the cream cheese adds a dose of protein and calcium, while the cocoa powder provides antioxidants. Using real butter and eggs also contributes essential nutrients.
If you’re watching gluten or dairy, options like almond flour and dairy-free cream cheese make this recipe adaptable. Just be mindful of sugar content if you’re counting carbs.
From a wellness perspective, I appreciate that this recipe relies on wholesome ingredients without artificial fillers, so you can enjoy a cozy dessert that feels a little more thoughtful.
Conclusion
If you’re craving something that’s both comforting and a bit special, these Fudgy Red Velvet Cheesecake Swirl Brownies with Creamy Marbling might just be your new favorite. They’re simple enough for a weeknight treat but impressive enough to bring to any gathering.
Honestly, I love how customizable they are—you can tweak flavors, textures, and even ingredients to fit your mood or pantry. And the visual wow factor? That creamy marbling always gets compliments, no matter who I share them with.
Why not give them a try? I’d love to hear how your batch turns out or what twists you add—don’t hesitate to leave a comment below and share your experience. Happy baking!
Frequently Asked Questions
Can I use boxed brownie mix for this recipe?
You can, but for the best fudgy texture and flavor, I recommend making the brownie base from scratch. Box mixes sometimes don’t blend well with the cheesecake swirl.
How do I prevent the cheesecake from cracking?
Make sure your cream cheese is fully softened and don’t overbeat. Also, bake at a moderate temperature and avoid opening the oven door during baking.
Can I make these ahead of time?
Absolutely! They taste great chilled and actually benefit from sitting overnight. Just store them in the fridge in an airtight container.
What’s the best way to cut clean slices?
Use a sharp knife and wipe it clean between cuts. Chilling the brownies before slicing also helps keep the layers distinct.
Is there a way to make them less sweet?
Yes, you can reduce the sugar in the brownie batter slightly or use a cream cheese with no added sugar. Just keep in mind it might affect texture and balance.
For a rich, textured dessert that’s as pretty as it is tasty, these brownies are a winner. If you enjoy baking, you might also like my classic fudge brownies or the creamy chocolate cheesecake brownies for more decadent treats.
Pin This Recipe!
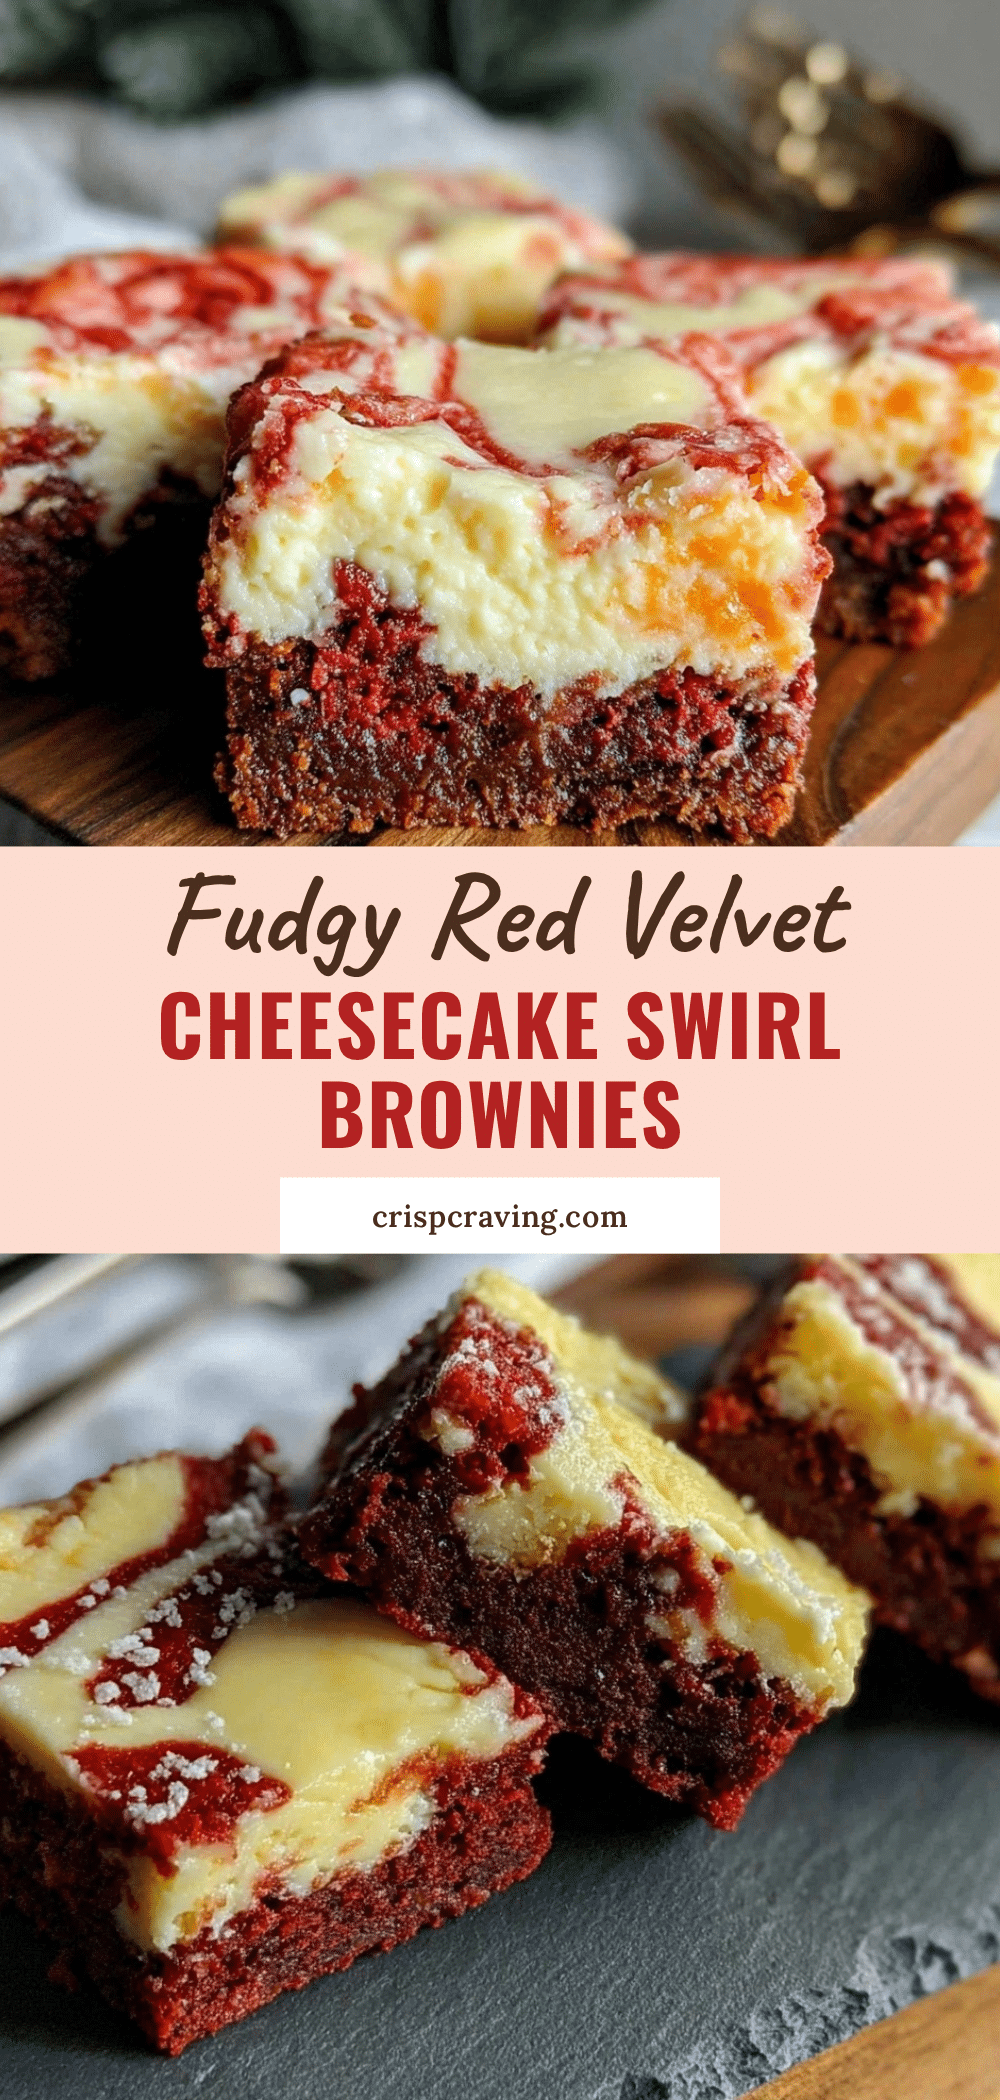
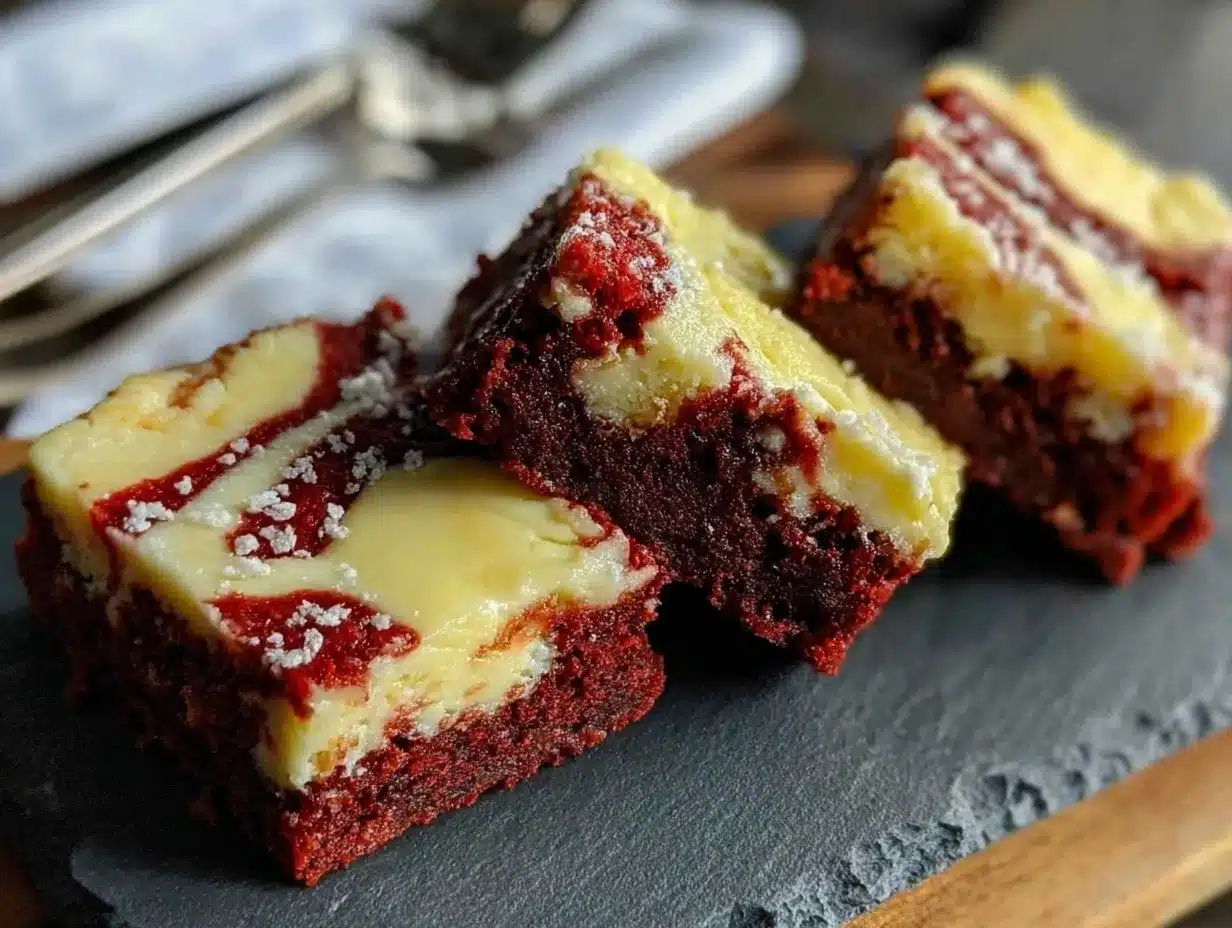
Fudgy Red Velvet Cheesecake Swirl Brownies
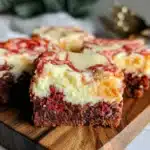
These brownies combine a rich, fudgy brownie base with a creamy, tangy cheesecake swirl infused with classic red velvet flavor, creating a beautifully marbled and indulgent dessert.
- Prep Time: 15 minutes
- Cook Time: 45 minutes
- Total Time: 1 hour 15 minutes
- Yield: 16 servings 1x
- Category: Dessert
- Cuisine: American
Ingredients
- 1/2 cup unsweetened cocoa powder (50 g)
- 1 cup all-purpose flour (120 g)
- 1 cup granulated sugar (200 g)
- 1/2 cup unsalted butter (115 g), melted and slightly cooled
- 2 large eggs, room temperature
- 1 tsp pure vanilla extract
- 1/4 tsp salt
- 8 oz cream cheese (225 g), softened
- 1/3 cup granulated sugar (65 g)
- 1 large egg, room temperature
- 1/2 tsp pure vanilla extract
- 1 tbsp red food coloring (gel-based)
- 1 tbsp all-purpose flour (8 g)
Instructions
- Preheat oven to 325°F (165°C). Line an 8×8 inch baking pan with parchment paper, leaving overhang for easy removal.
- In a medium bowl, whisk together cocoa powder, flour, sugar, and salt until evenly combined.
- In another bowl, beat melted butter, eggs, and vanilla extract until smooth (about 1-2 minutes).
- Gradually add dry ingredients to wet, folding gently with a spatula until just combined. Do not overmix.
- Using a mixer, beat softened cream cheese until smooth (2-3 minutes). Add sugar, egg, vanilla, and red food coloring; beat until incorporated.
- Sprinkle in flour and mix just until combined to avoid gummy texture.
- Pour half of the brownie batter into the prepared pan and spread evenly.
- Dollop half of the cheesecake mixture on top in spoonfuls. Repeat with remaining brownie batter and cheesecake dollops.
- Use a toothpick or skewer to swirl the mixtures gently, creating a marbled effect without overmixing.
- Bake for 40-45 minutes until edges are set and center jiggles slightly. For firmer brownies, bake 3-5 minutes longer, watching closely.
- Cool completely in the pan on a wire rack (about 1 hour). Chill in the fridge for 2 hours to set cheesecake swirl.
- Use parchment overhang to lift brownies out before slicing.
Notes
Use room temperature eggs and cream cheese for smoother texture. Fold brownie batter gently to avoid cakey brownies. Do not over-swirl the marbling to keep distinct patterns. Baking at 325°F ensures even cooking without drying out the cheesecake. Chilling brownies before slicing helps maintain clean layers. Parchment paper overhang makes removal easier.
Nutrition
- Serving Size: 1 brownie square (ap
- Calories: 300
- Sugar: 25
- Sodium: 180
- Fat: 18
- Saturated Fat: 10
- Carbohydrates: 35
- Fiber: 2
- Protein: 5
Keywords: brownies, red velvet, cheesecake swirl, fudgy brownies, creamy marbling, dessert, easy brownies, homemade brownies