Love this? Save it for later!
Share the inspiration with your friends
Introduction
Three summers ago, I found myself standing in my tiny kitchen at midnight, craving something cool but not just any old popsicle. I wanted a treat that reminded me of those classic Bomb Pop popsicles from childhood — you know, the ones with the perfect blend of cherry, lime, and blue raspberry flavors all stacked in that iconic red, white, and blue swirl. But honestly, I was too tired to stand over a hot stove or wait for hours. That’s when the idea struck me: what if I could turn that nostalgic popsicle into a creamy, dreamy cheesecake without even turning the oven on?
It wasn’t all smooth sailing. At first, I tried to simply layer fruit-flavored gelatin and cream cheese, but it ended up tasting like a weird jello mishmash. Then, after a bit of trial and error (and a few accidental spills on the counter), I landed on the perfect no-bake cheesecake base that was silky, tangy, and just sweet enough to match the popsicle’s playful flavors. I even managed to get the layers to hold their shape, which honestly felt like a small kitchen miracle!
Maybe you’ve been there — that late-night urge for something both nostalgic and new, with zero fuss. This creamy no-bake Bomb Pop popsicle cheesecake is exactly that kind of recipe. It’s playful, colorful, and so easy to put together that it quickly became my go-to summer dessert. Plus, it’s a crowd-pleaser at every barbecue and potluck I’ve taken it to, even stealing the spotlight from some pretty fancy cakes.
Let me tell you, the way the creamy cheesecake melts in your mouth against the tangy, fruity layers is honestly worth the few extra minutes it takes to prep. And if you’re someone who’s ever wished for a grown-up popsicle, this recipe is your dream come true.
Why You’ll Love This Recipe
After testing and tweaking this recipe over several summers, I’m confident this creamy no-bake Bomb Pop popsicle cheesecake stands out from all the other no-bake cheesecakes out there. Here’s why it’ll quickly become a favorite in your recipe box:
- Quick & Easy: Comes together in under 20 minutes, making it perfect for those last-minute dessert cravings or busy weeknights.
- Simple Ingredients: No complicated or exotic ingredients—most are pantry staples or easy to find at any grocery store.
- Perfect for Summer Gatherings: Bright, colorful, and refreshingly creamy, it’s an ideal dessert for barbecues, Fourth of July celebrations, or casual get-togethers.
- Crowd-Pleaser: Kids and adults alike rave about the familiar Bomb Pop flavor combined with the richness of cheesecake.
- Unbelievably Delicious: The texture is silky and smooth, with a perfect balance of sweet and tart, mimicking those iconic popsicle layers.
What really makes this recipe different is how the no-bake cheesecake base is whipped to a light, airy texture, which contrasts beautifully with the layered fruit flavors. I personally prefer using full-fat cream cheese and a touch of sour cream to keep it tangy. The layered approach gives it a fun visual twist, and the popsicle sticks are more than just decorative—they make serving and eating a breeze, especially on warm days.
Honestly, this recipe isn’t just a dessert; it’s a little portable celebration of summer nostalgia with a grown-up twist. Whether you’re looking to impress guests or just want a fun treat to cool off with, this cheesecake hits all the right notes.
What Ingredients You Will Need
This recipe uses simple, wholesome ingredients to deliver bold flavor and satisfying texture without the fuss. Most of these are pantry staples, with a few fresh items that bring the dessert to life. Here’s what you’ll need:
For the Crust
- 1 ½ cups graham cracker crumbs (about 10-12 full sheets)
- 5 tablespoons unsalted butter, melted (I like using Land O Lakes for richness)
- 2 tablespoons granulated sugar
For the Creamy Cheesecake Filling
- 16 oz (450g) cream cheese, softened (full-fat for best texture)
- ½ cup sour cream (adds tanginess and creaminess)
- ¾ cup powdered sugar, sifted
- 1 teaspoon pure vanilla extract
- 1 cup heavy cream, cold (for whipping)
For the Bomb Pop Popsicle Layers
- ½ cup strawberry or cherry gelatin (prepared according to package instructions, slightly cooled)
- ½ cup lime gelatin (prepared and cooled)
- ½ cup blue raspberry gelatin (prepared and cooled)
Additional Items
- Wooden popsicle sticks
- Optional: Fresh berries or mint leaves for garnish
If you want a dairy-free version, swap the cream cheese and sour cream for vegan alternatives and use coconut cream instead of heavy cream. For gluten-free, simply use gluten-free graham cracker crumbs or crushed gluten-free cookies.
Equipment Needed
- Mixing bowls — a large bowl for the crust and another for the cheesecake filling
- Electric mixer or stand mixer — to whip the cream and blend the filling smoothly
- 9×5-inch loaf pan or popsicle molds — I prefer a loaf pan lined with parchment paper for easy removal
- Measuring cups and spoons — accuracy makes a difference here
- Rubber spatula — great for folding whipped cream into the cheese mixture
- Whisk — handy for mixing gelatin and smoothing ingredients
If you don’t own a stand mixer, a good quality hand mixer works just as well. I once made this cheesecake with a whisk and a lot of elbow grease—trust me, the electric mixer is worth it! For a budget-friendly option, you can repurpose an old loaf pan or even small paper cups to make individual portions.
Preparation Method
- Prepare the crust: In a bowl, combine the graham cracker crumbs, melted butter, and sugar. Stir until the mixture resembles wet sand. Press this firmly into the bottom of your 9×5-inch loaf pan, creating an even layer. Chill in the fridge while you make the filling. (About 10 minutes)
- Mix the cheesecake base: Using an electric mixer, beat the softened cream cheese, sour cream, powdered sugar, and vanilla extract until smooth and creamy, about 2-3 minutes. Scrape down the sides as needed to avoid lumps.
- Whip the cream: In a separate bowl, whip the cold heavy cream until stiff peaks form. Be careful not to overwhip—it should hold shape but still be silky.
- Fold whipped cream into the cheese mixture: Gently fold about half of the whipped cream into the cream cheese mixture to lighten it. Then fold in the rest carefully, keeping the texture airy and fluffy.
- Layer the cheesecake and gelatin: Pour a thin layer of the creamy cheesecake base over the crust and smooth it out. Chill for 10 minutes to set slightly.
- Add the first gelatin layer: Pour the cooled but still liquid strawberry or cherry gelatin evenly over the cheesecake layer. Place popsicle sticks into the gelatin layer spaced evenly (I did 6 sticks). Chill again until partially set but not firm—about 20 minutes.
- Repeat layering: Pour another cheesecake layer over the set gelatin (about ½ inch thick). Chill for 10 minutes. Then add the lime gelatin layer, insert popsicle sticks if needed to support, and chill again. Repeat with the final cheesecake layer and blue raspberry gelatin layer, chilling between each step.
- Final freeze: Once all layers are done, cover the pan with plastic wrap and freeze for at least 4 hours or overnight until completely firm.
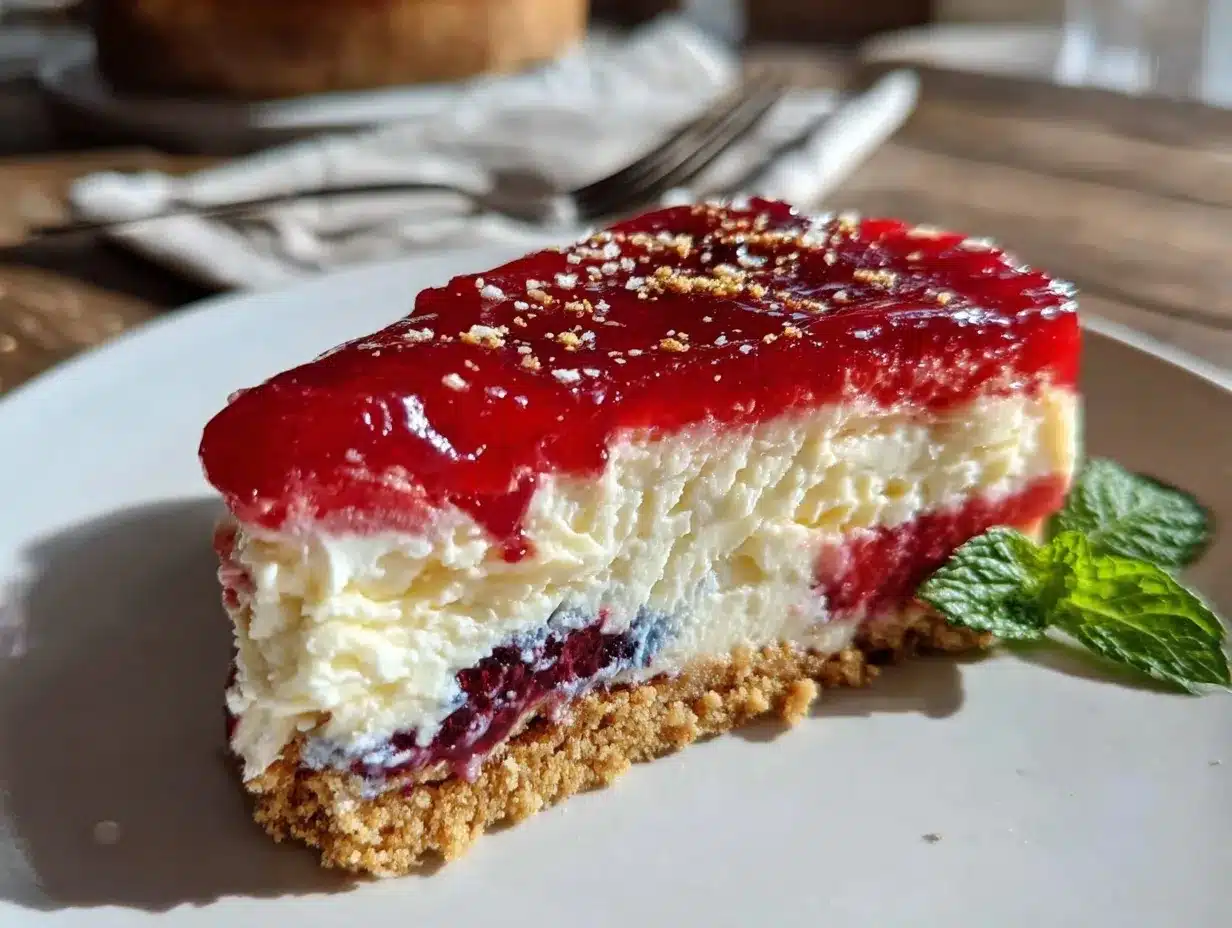
- Serving: To serve, run a warm knife around the edges and lift the cheesecake block using the parchment paper. Slice between the popsicle sticks and pull out each creamy Bomb Pop cheesecake. Garnish with fresh berries or mint if desired.
Pro tip: If your gelatin layers seem too firm before adding the cheesecake layers, let them soften a bit at room temperature for 5 minutes. This keeps the layers from cracking. Also, don’t rush chilling times—patience here keeps those stripes clean and pretty.
Cooking Tips & Techniques
One important trick I learned is to let the gelatin cool but remain pourable before layering. If it’s too hot, it’ll melt the cheesecake layer and blur your colors. Too cold, and it won’t spread evenly. I usually wait about 15-20 minutes after preparing the gelatin before pouring it over the cheesecake base.
When folding whipped cream into the cream cheese mixture, take your time and use a gentle folding motion. You want to keep that light texture, so avoid over-mixing or you’ll end up with a denser filling—still tasty, but not as dreamy.
Another tip: chill the crust first so it firms up and doesn’t crumble when you add the creamy layers. This also helps when you slice the cheesecake popsicles later on.
Don’t skip the step of chilling between layers. It might feel like extra waiting, but it really helps keep the layers neat and prevents them from mixing. Multitasking in the kitchen during those chill times (like prepping drinks or tidying up) saves time.
Finally, when freezing the finished cheesecake, cover it well to prevent freezer burn or unwanted odors. I like to wrap the pan in plastic wrap and then a layer of foil for extra protection.
Variations & Adaptations
This recipe is pretty flexible—and I’ve tried a few variations that turned out great:
- Dietary Adaptations: For a vegan version, substitute the cream cheese and sour cream with cashew cream or vegan cream cheese, and use agar-agar instead of gelatin. Coconut cream whipped with a little powdered sugar works well instead of heavy cream.
- Seasonal Flavors: Swap the gelatin flavors for fresh fruit purees layered with unflavored gelatin to make strawberry, kiwi, and blueberry layers that feel more summery and fresh.
- Alcohol Twist: Add a splash of flavored liqueur like limoncello or cherry brandy to the cheesecake base for a grown-up kick.
Once, I experimented by swapping the graham cracker crust with crushed pretzels and a bit of brown sugar. It added a salty-sweet crunch that was surprisingly addictive. Don’t be afraid to get creative with your crust or toppings!
Serving & Storage Suggestions
This popsicle cheesecake is best served straight from the freezer—cold and firm, but let it sit for 5 minutes at room temperature before slicing to make cutting easier. I love setting them out on a colorful platter with fresh berries and a few mint leaves for that extra pop of color and freshness.
Pair this dessert with a light iced tea, lemonade, or even a sparkling rosé if you’re feeling fancy. It’s the perfect sweet finish after a summer meal.
For storage, keep leftovers tightly wrapped in plastic wrap or in an airtight container in the freezer. It should keep well for up to 2 weeks. When reheating, just let them thaw in the fridge for a few hours or at room temperature for about 20 minutes—don’t microwave or you’ll lose that creamy texture.
The flavors actually develop and meld together the longer it sits in the freezer, so it’s a great make-ahead dessert for parties.
Nutritional Information & Benefits
Each serving of this no-bake Bomb Pop popsicle cheesecake is roughly 280 calories, with 18 grams of fat, 25 grams of carbs, and 5 grams of protein. It’s a treat, so enjoy in moderation!
The cream cheese and sour cream provide a good source of calcium and protein, while the gelatin layers add a nostalgic fruit flavor without extra fat or calories.
For those watching carbs, consider using a sugar substitute in the crust and filling, or swapping regular graham crackers for a low-carb alternative. The recipe is naturally gluten-free if you use gluten-free crumbs.
From a wellness standpoint, this dessert offers a satisfying sweet fix that won’t leave you feeling weighed down or overly heavy—as long as you savor just one or two slices!
Conclusion
Honestly, this creamy no-bake Bomb Pop popsicle cheesecake has become one of my all-time favorite desserts because it brings back joyful summer memories in the best way—without any fuss. It’s easy to make, playful to present, and delicious to eat.
Feel free to tweak the flavors, crust, or presentation to match your tastes or occasion. Whether you’re making it for a family barbecue or a casual weekday treat, I promise it won’t disappoint.
I’d love to hear how your cheesecake turns out or any fun twists you try! Drop a comment below, share your photos, or let me know if you have questions about the recipe. Happy cheesecake making!
Remember—sometimes the best recipes come from a little late-night kitchen inspiration and a craving for something both nostalgic and new.
FAQs
Can I make this cheesecake without gelatin?
Gelatin is key for the layered popsicle effect, but if you want a simpler cheesecake, you can omit the gelatin layers and just make a classic no-bake cheesecake. The popsicle theme won’t be as distinct, though.
How long does this cheesecake need to chill before serving?
It needs at least 4 hours in the freezer to set properly, but overnight is even better for clean slicing and firm layers.
Can I prepare this dessert ahead of time?
Yes! It actually tastes better after resting in the freezer for a day or two, as the flavors meld beautifully.
What if I don’t have popsicle sticks?
You can still make the layered cheesecake in a loaf pan and slice it into bars. The sticks add fun and ease but aren’t mandatory.
Is there a way to make this recipe gluten-free?
Absolutely! Use gluten-free graham cracker crumbs or substitute with crushed gluten-free cookies for the crust.
Pin This Recipe!
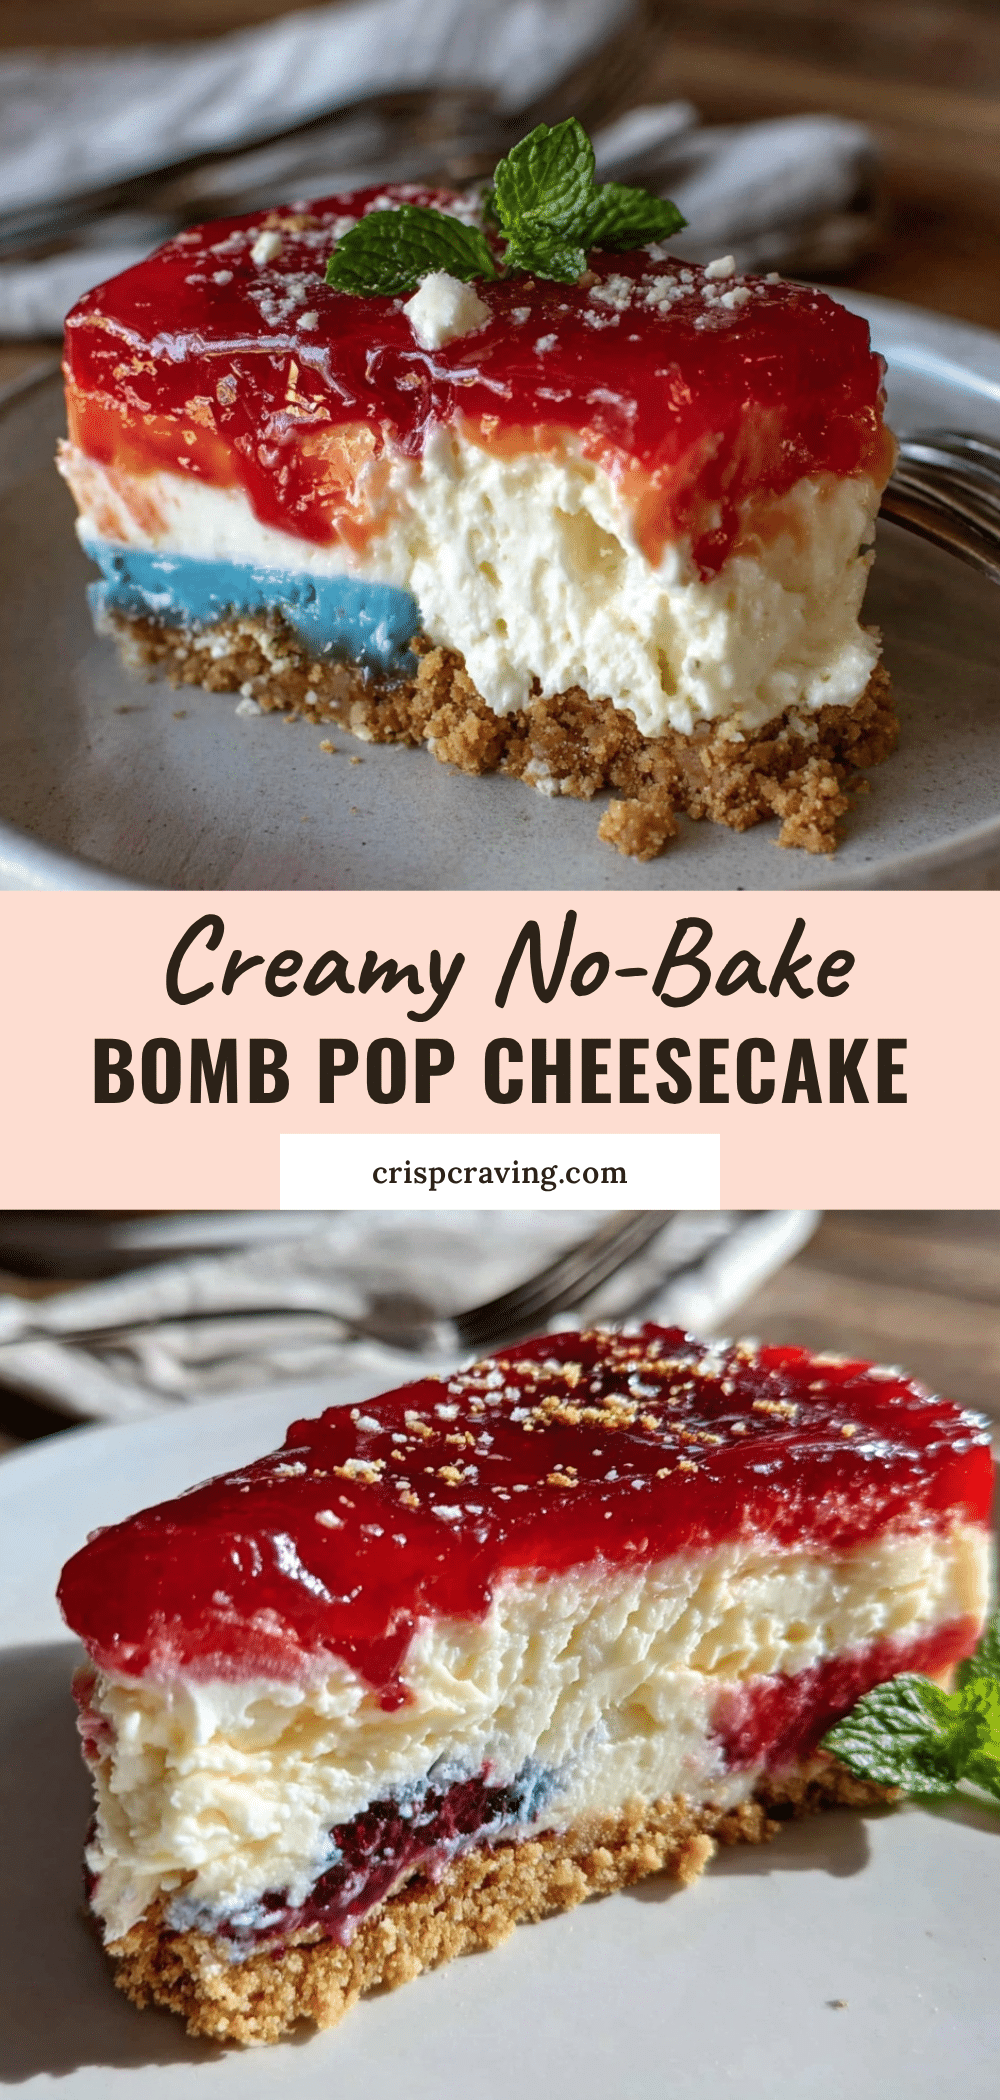
Creamy No-Bake Bomb Pop Popsicle Cheesecake
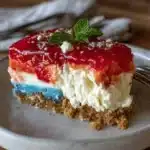
A playful, colorful, and easy no-bake cheesecake inspired by classic Bomb Pop popsicles, featuring layers of cherry, lime, and blue raspberry gelatin with a creamy cheesecake base.
- Prep Time: 15 minutes
- Cook Time: 0 minutes
- Total Time: 4 hours 15 minutes
- Yield: 6 servings 1x
- Category: Dessert
- Cuisine: American
Ingredients
- 1 ½ cups graham cracker crumbs (about 10–12 full sheets)
- 5 tablespoons unsalted butter, melted
- 2 tablespoons granulated sugar
- 16 oz (450g) cream cheese, softened (full-fat for best texture)
- ½ cup sour cream
- ¾ cup powdered sugar, sifted
- 1 teaspoon pure vanilla extract
- 1 cup heavy cream, cold
- ½ cup strawberry or cherry gelatin (prepared and slightly cooled)
- ½ cup lime gelatin (prepared and cooled)
- ½ cup blue raspberry gelatin (prepared and cooled)
- Wooden popsicle sticks
- Optional: Fresh berries or mint leaves for garnish
Instructions
- Prepare the crust: In a bowl, combine the graham cracker crumbs, melted butter, and sugar. Stir until the mixture resembles wet sand. Press this firmly into the bottom of your 9×5-inch loaf pan, creating an even layer. Chill in the fridge for about 10 minutes.
- Mix the cheesecake base: Using an electric mixer, beat the softened cream cheese, sour cream, powdered sugar, and vanilla extract until smooth and creamy, about 2-3 minutes. Scrape down the sides as needed.
- Whip the cream: In a separate bowl, whip the cold heavy cream until stiff peaks form, being careful not to overwhip.
- Fold whipped cream into the cheese mixture: Gently fold about half of the whipped cream into the cream cheese mixture to lighten it, then fold in the rest carefully to keep the texture airy and fluffy.
- Layer the cheesecake and gelatin: Pour a thin layer of the creamy cheesecake base over the crust and smooth it out. Chill for 10 minutes to set slightly.
- Add the first gelatin layer: Pour the cooled but still liquid strawberry or cherry gelatin evenly over the cheesecake layer. Place popsicle sticks into the gelatin layer spaced evenly (about 6 sticks). Chill until partially set but not firm, about 20 minutes.
- Repeat layering: Pour another cheesecake layer over the set gelatin (about ½ inch thick). Chill for 10 minutes. Then add the lime gelatin layer, insert popsicle sticks if needed to support, and chill again. Repeat with the final cheesecake layer and blue raspberry gelatin layer, chilling between each step.
- Final freeze: Once all layers are done, cover the pan with plastic wrap and freeze for at least 4 hours or overnight until completely firm.
- Serving: Run a warm knife around the edges and lift the cheesecake block using the parchment paper. Slice between the popsicle sticks and pull out each creamy Bomb Pop cheesecake. Garnish with fresh berries or mint if desired.
Notes
Let gelatin cool but remain pourable before layering to avoid melting cheesecake layers. Chill crust before adding filling to prevent crumbling. Chill between layers to keep layers neat and prevent mixing. Cover well when freezing to avoid freezer burn. For dairy-free, use vegan cream cheese, sour cream alternatives, and coconut cream. For gluten-free, use gluten-free graham cracker crumbs or cookies.
Nutrition
- Serving Size: One popsicle cheesec
- Calories: 280
- Fat: 18
- Carbohydrates: 25
- Protein: 5
Keywords: no-bake cheesecake, Bomb Pop, popsicle cheesecake, summer dessert, layered gelatin, easy cheesecake, no oven dessert