Love this? Save it for later!
Share the inspiration with your friends
“I’ve never been a fan of Halloween cookies,” my friend Jenna confessed one chilly October evening. For years, she’d refused to touch anything too themed or gimmicky, claiming it was all just sugar overload wrapped in a tacky disguise. Then, one night, I whipped up these Flavorful Witch Hat Peanut Butter Chocolate Chip Cookie Cones just as a fun experiment, mostly for myself. But Jenna? She was caught red-handed, sneaking bites between sips of cider, completely hooked before I even realized.
Let me tell you, the magic here isn’t just in the look—though, honestly, who can resist a cookie shaped like a witch’s hat? It’s in the surprising combo of creamy peanut butter and melty chocolate chips hugging a crunchy cone, creating a texture and flavor balance that flips the usual Halloween treat script. I remember knocking over a bowl of dough mid-bake (classic me), but the resulting batch was so good, it stayed with us through the entire spooky season.
Maybe you’ve been there—skeptical about themed treats that promise a lot but deliver little. This recipe isn’t just a cute idea; it’s something that quietly won over a tough crowd, and I’m betting it’ll do the same for you. Plus, it’s fun to make, and honestly, it’s one of those recipes that makes you look like you put in way more effort than you actually did. So, if you’re ready to surprise yourself and maybe even convert a Halloween cookie skeptic or two, read on!
Why You’ll Love This Recipe
From my kitchen trials to the final taste tests, these peanut butter chocolate chip cookie cones have become a staple for spooky celebrations. Here’s why you might want to keep this recipe close:
- Quick & Easy: Comes together in under 30 minutes, perfect for last-minute Halloween prep or an impromptu treat.
- Simple Ingredients: No need for fancy or hard-to-find items; you probably have most of these pantry staples already.
- Perfect for Halloween Parties: These whimsical witch hat cones add a festive touch without fuss, great for kids and adults alike.
- Crowd-Pleaser: Peanut butter lovers and chocolate chip fans alike rave about the flavor combo and the fun presentation.
- Unbelievably Delicious: The creamy peanut butter mixed into the cookie dough keeps the cones moist with just the right chew, while the chocolate chips add that familiar sweet pop.
Unlike regular cookies, these cones bring a playful twist that makes them stand out on any dessert table. The peanut butter isn’t just a background player—it’s the heart of the flavor, perfectly balanced with the chocolate. Plus, shaping the dough around waffle cones adds a satisfying crunch and keeps things neat (mostly), which I’ve learned after a few too many crumb-filled mishaps. It’s a recipe that makes you feel like a Halloween hero, no matter your baking skill level.
What Ingredients You Will Need
This recipe is all about simple, wholesome ingredients that come together to create a delightfully flavorful treat. Whether you’re baking for a crowd or just a cozy night in, you’ll find everything easy to source and straightforward to prepare.
- For the Cookie Dough:
- 1 cup (225g) unsalted butter, softened (I prefer Plugrá for its creamy texture)
- 1 cup (200g) granulated sugar
- 1 cup (220g) packed light brown sugar (adds that deep caramel note)
- 1 cup (270g) creamy peanut butter (natural or classic, depending on your taste)
- 2 large eggs, room temperature
- 2 ½ cups (315g) all-purpose flour (King Arthur flour works great for structure)
- 1 teaspoon baking soda
- ½ teaspoon salt
- 1 ½ cups (270g) semi-sweet chocolate chips (Ghirardelli recommended for best melt)
- For the Cones:
- 12 waffle cones (regular size; sturdy, not too thin)
- Optional Decoration:
- Black or orange icing to pipe “witch hat” details
- Sprinkles or edible glitter for festive flair
Feel free to swap in almond flour for a gluten-free version or coconut sugar if you want a less refined sweetener. If peanut allergies are a concern, sunflower seed butter works surprisingly well here, keeping the richness and texture intact. In the fall, I sometimes add a pinch of cinnamon or pumpkin pie spice to the dough for a seasonal twist. For the cones, look for ones without added flavors or coatings to keep the focus on the cookie.
Equipment Needed
- Baking sheet(s) lined with parchment paper or silicone baking mats
- Mixing bowls (at least two: one large, one medium)
- Hand mixer or stand mixer with paddle attachment (makes creaming butter and sugar easier)
- Measuring cups and spoons for accuracy
- Spatula for folding in chocolate chips
- Cooling rack (important for letting cones cool properly)
- Oven thermometer (optional but handy to keep baking temperature steady)
- A small offset spatula or butter knife for spreading dough on the cones
If you don’t have a stand mixer, a sturdy hand mixer works just fine, though it might take a bit more arm work. I once baked these using a wooden spoon and some elbow grease—if you’re up for it, totally doable. For budget-friendly baking, parchment paper can be swapped out with a lightly greased baking sheet, but I recommend the parchment for easier cleanup and to prevent sticking. The cones can be found at most grocery stores or specialty baking shops, and if you want to keep them extra crisp, store them in an airtight container before baking.
Preparation Method

- Preheat your oven to 350°F (175°C) and line your baking sheets with parchment paper. This step sets the stage for even baking and easy cleanup.
- Cream the butter and sugars: In a large bowl, beat 1 cup softened unsalted butter, 1 cup granulated sugar, and 1 cup packed light brown sugar together using a stand or hand mixer on medium speed until light and fluffy, about 3-4 minutes. This is where the cookie’s texture begins to form—don’t rush it.
- Add peanut butter and eggs: Mix in 1 cup creamy peanut butter until smooth, then beat in 2 large eggs one at a time. The dough will look rich and creamy now. If you forget to bring eggs to room temp like I occasionally do, just give them a quick warm water bath before cracking—they blend better that way.
- Combine dry ingredients: In a separate bowl, whisk together 2 ½ cups all-purpose flour, 1 teaspoon baking soda, and ½ teaspoon salt. Gradually add this mix to the wet ingredients on low speed, mixing just until combined. Overmixing here can lead to tougher cookies, so stop when you see no more flour patches.
- Fold in chocolate chips: Using a spatula, gently fold in 1 ½ cups semi-sweet chocolate chips. Be careful not to break them up too much; we want those melty pockets of chocolate to shine.
- Shape the cones: Take your waffle cones and carefully spread a generous spoonful of cookie dough around each cone’s outside, shaping it into a witch hat form—wider at the brim, narrowing towards the tip. It helps to keep your hands lightly floured to prevent sticking. Don’t worry about perfection; the rustic look adds charm.
- Bake: Place the dough-covered cones upright on the baking sheets (I use empty cans or glasses to keep them steady). Bake for 12-15 minutes, rotating halfway through baking to ensure even color. The edges should be golden brown, and the cookie dough firm but still soft to the touch.
- Cool: Let the cones cool completely on a rack before decorating or serving. This step is crucial; warm cones can be fragile and prone to breaking.
- Optional decoration: Pipe black or orange icing to add witch hat details or sprinkle edible glitter for extra festive fun. I find this step is a hit with kids, and it makes the cones look extra special.
Pro tip: If you notice the dough slipping off the cones during baking, chilling the shaped cones for 10 minutes before baking can help firm the dough up. Also, keep an eye on the oven; every stove’s a bit different, and you don’t want those chocolate chips burning.
Cooking Tips & Techniques
Making these peanut butter chocolate chip cookie cones comes with a few tricks that can really make your life easier:
- Use room temperature ingredients: It’s tempting to skip this, but softened butter and eggs at room temp mix more evenly, giving you that smooth dough we want.
- Don’t overmix the dough: Once you add the flour, mix just enough to bring everything together. Overworking develops gluten, making cookies tough—nobody wants that!
- Keep cones upright while baking: Using empty cans or a muffin tin to hold cones steady prevents dough from sliding off or uneven baking.
- Chill dough if too sticky: If your dough feels too soft to shape, pop it in the fridge for 20 minutes. This makes handling easier without drying it out.
- Watch your oven temp: An oven thermometer is a great investment. I’ve burned more than one batch by relying solely on the dial.
- Multitasking: While the cones bake, prep your decorations or clean up. It’s a great way to save time and keep the kitchen tidy.
Speaking from experience, I once tried piping icing on warm cones and ended up with a melted mess. Patience is key! Letting cookies cool fully before decorating makes all the difference. Also, if you want extra crisp edges, try baking a minute or two longer, but keep an eye to avoid burning chocolate chips.
Variations & Adaptations
One of the best parts about this recipe is how easy it is to tweak for different tastes and needs:
- Dietary adaptations: Swap all-purpose flour for gluten-free flour blends like Bob’s Red Mill 1-to-1. Use dairy-free butter and dairy-free chocolate chips for vegan versions.
- Flavor twists: Add a teaspoon of cinnamon or pumpkin pie spice for a fall vibe, or try swapping peanut butter for almond or cashew butter for a different nutty profile.
- Cooking methods: If you don’t have waffle cones, try sturdy sugar cones or even homemade cone shapes from cookie dough rolled thin and baked separately.
- Allergen substitutions: For nut allergies, sunflower seed butter works well and keeps that creamy texture.
- Personal variation: I once lightly dipped the cone tips in melted dark chocolate and sprinkled crushed toffee bits—total game changer for texture and flavor!
Serving & Storage Suggestions
Serve these Flavorful Witch Hat Peanut Butter Chocolate Chip Cookie Cones at room temperature for the best texture balance—crispy cone with chewy cookie dough. They look fantastic arranged on a platter with some fresh apple slices or a warm cup of spiced cider to complement the nutty chocolate flavors.
To store, place cones in an airtight container at room temperature for up to 3 days. For longer storage, wrap individually in plastic wrap and freeze for up to 2 months. When ready to enjoy, thaw at room temperature for about 30 minutes.
Reheating is not usually necessary, but if you prefer a warm treat, pop them in a 300°F (150°C) oven for 3-5 minutes. Just be careful not to melt your chocolate chips or decorations.
Over time, the flavors meld beautifully, especially if stored overnight. The peanut butter and chocolate intensify, making the cones taste even better the next day—a little secret worth knowing when prepping for Halloween gatherings.
Nutritional Information & Benefits
Each cookie cone provides approximately:
| Nutrient | Amount per serving |
|---|---|
| Calories | 220 kcal |
| Fat | 14g (mostly from peanut butter and butter) |
| Carbohydrates | 22g |
| Protein | 5g |
| Fiber | 2g |
Peanut butter adds a good source of protein and healthy fats, which help keep you satisfied. Chocolate chips offer antioxidants, and the recipe can be tailored to reduce sugar or use alternative sweeteners for dietary preferences. These cones are gluten-containing by default but can be made gluten-free with simple flour swaps.
From a wellness perspective, this treat brings a balanced mix of indulgence and nourishment, especially when enjoyed mindfully. It’s a fun, festive way to include protein and fat that slows sugar absorption, which is nice when you’re surrounded by Halloween candy temptation.
Conclusion
So, why should you make these Flavorful Witch Hat Peanut Butter Chocolate Chip Cookie Cones? Because they’re more than just cute—they’re a genuinely tasty and satisfying treat that has quietly converted skeptics. Whether you’re baking for a party, a family night, or just because you want a bit of Halloween fun, these cones hit the mark.
Don’t be afraid to personalize the recipe with your favorite nut butter or spices, and have fun decorating to match your spooky style. Honestly, it’s one of those recipes that brings a smile and a little pride, even if your kitchen gets a bit messy in the process.
If you try them, please leave a note or share your twist—I’d love to hear how your cones turned out. Happy baking, and may your Halloween be deliciously delightful!
FAQs
Can I make these cookie cones ahead of time?
Yes! You can bake and decorate them a day in advance. Store in an airtight container at room temperature to keep them fresh.
What can I use if I can’t find waffle cones?
Sturdy sugar cones or even homemade cookie dough cones rolled and baked separately work well as alternatives.
Is there a way to make these vegan?
Absolutely. Use dairy-free butter, egg replacers like flax eggs, and dairy-free chocolate chips to make a delicious vegan version.
How do I prevent the cookie dough from sliding off the cones?
Chilling the dough-covered cones for 10 minutes before baking helps, and standing cones upright on a stable surface while baking is key.
Can I add other mix-ins besides chocolate chips?
Yes! Chopped nuts, toffee bits, or dried fruit can be folded into the dough for different flavor and texture profiles.
Pin This Recipe!
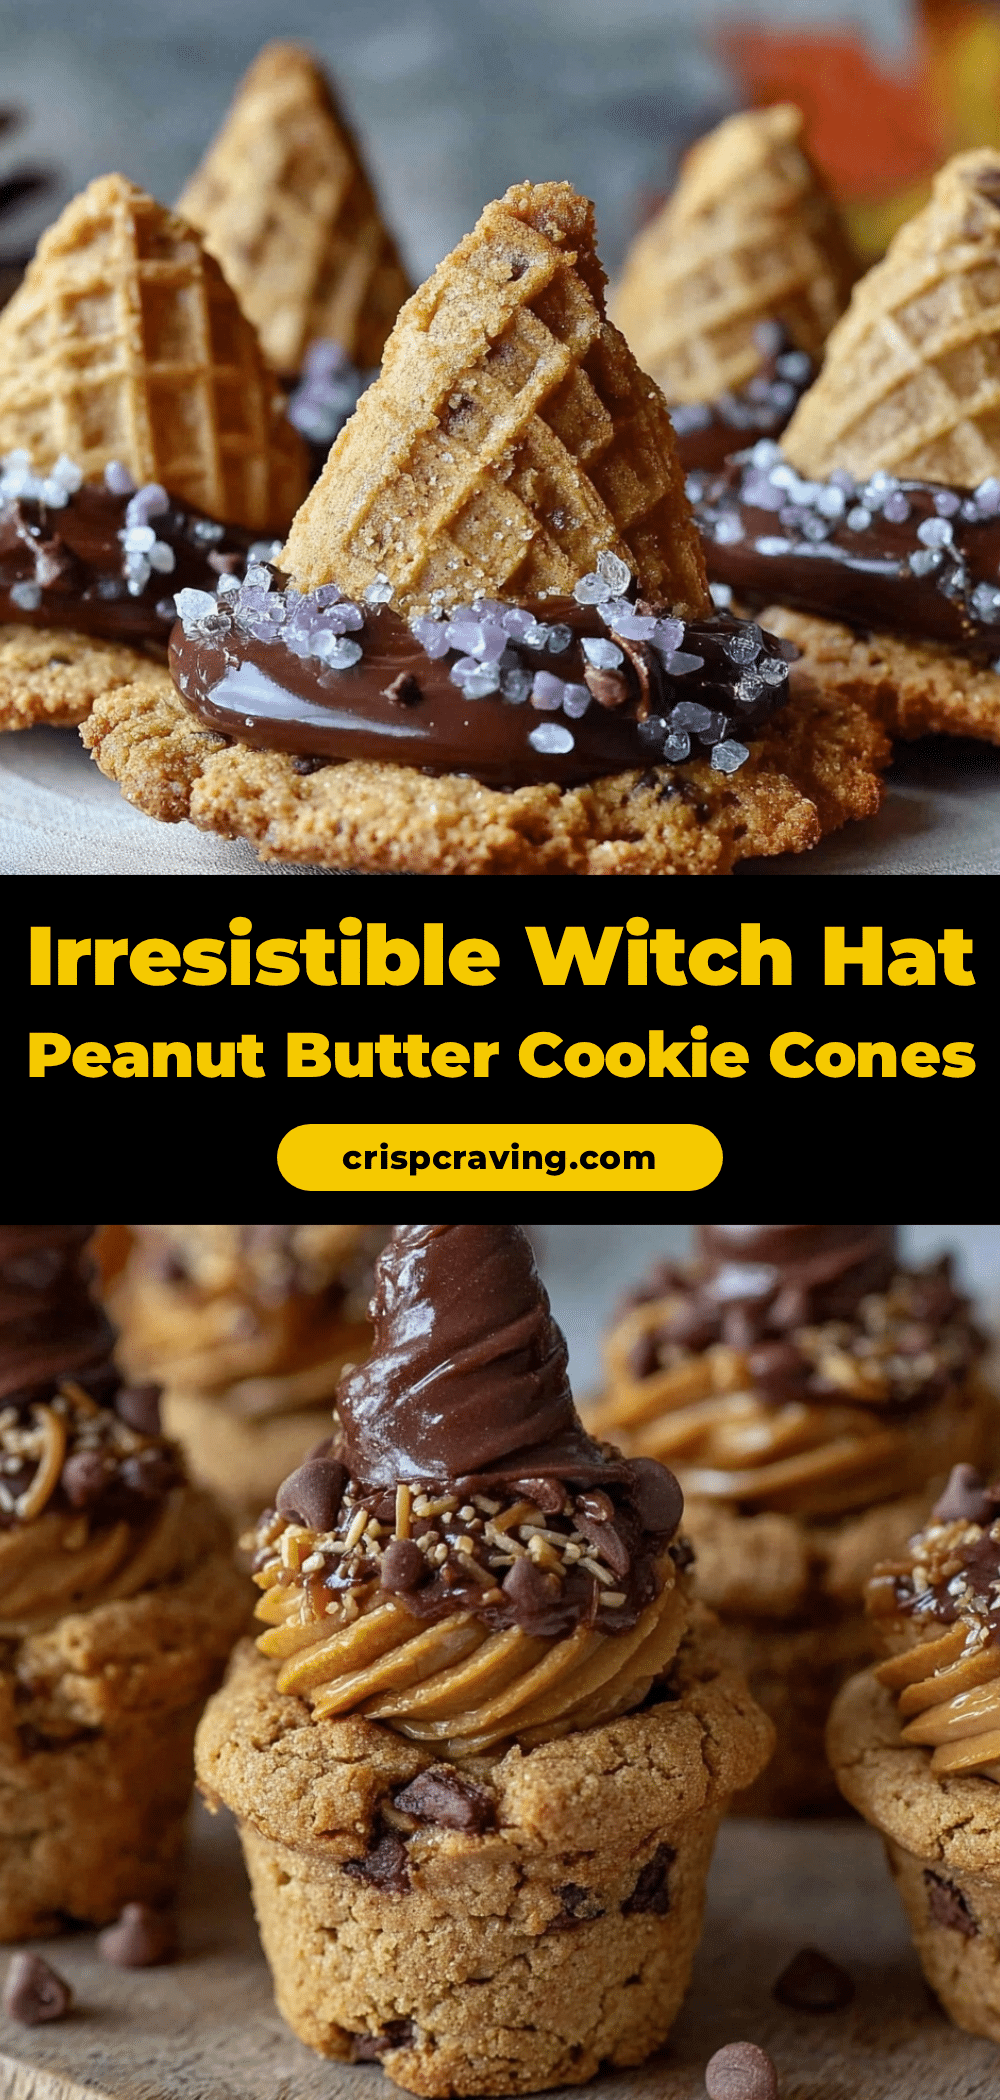
Flavorful Witch Hat Peanut Butter Chocolate Chip Cookie Cones

These whimsical witch hat cookie cones combine creamy peanut butter and melty chocolate chips wrapped around crunchy waffle cones, creating a fun and delicious Halloween treat that’s quick and easy to make.
- Prep Time: 15 minutes
- Cook Time: 15 minutes
- Total Time: 30 minutes
- Yield: 12 servings 1x
- Category: Dessert
- Cuisine: American
Ingredients
- 1 cup (225g) unsalted butter, softened
- 1 cup (200g) granulated sugar
- 1 cup (220g) packed light brown sugar
- 1 cup (270g) creamy peanut butter
- 2 large eggs, room temperature
- 2 ½ cups (315g) all-purpose flour
- 1 teaspoon baking soda
- ½ teaspoon salt
- 1 ½ cups (270g) semi-sweet chocolate chips
- 12 waffle cones (regular size; sturdy, not too thin)
- Optional: black or orange icing for decoration
- Optional: sprinkles or edible glitter for festive flair
Instructions
- Preheat your oven to 350°F (175°C) and line your baking sheets with parchment paper.
- In a large bowl, beat 1 cup softened unsalted butter, 1 cup granulated sugar, and 1 cup packed light brown sugar together using a mixer on medium speed until light and fluffy, about 3-4 minutes.
- Mix in 1 cup creamy peanut butter until smooth, then beat in 2 large eggs one at a time.
- In a separate bowl, whisk together 2 ½ cups all-purpose flour, 1 teaspoon baking soda, and ½ teaspoon salt. Gradually add this to the wet ingredients on low speed, mixing just until combined.
- Gently fold in 1 ½ cups semi-sweet chocolate chips using a spatula.
- Carefully spread a generous spoonful of cookie dough around each waffle cone’s outside, shaping it into a witch hat form.
- Place the dough-covered cones upright on the baking sheets using empty cans or glasses to keep them steady.
- Bake for 12-15 minutes, rotating halfway through, until edges are golden brown and dough is firm but soft to the touch.
- Let the cones cool completely on a rack before decorating or serving.
- Optional: Pipe black or orange icing to add witch hat details or sprinkle edible glitter for extra festive fun.
Notes
Use room temperature ingredients for best mixing. Chill dough-covered cones for 10 minutes before baking if dough slips. Keep cones upright during baking using cans or glasses. Avoid overmixing flour to prevent tough cookies. Let cones cool completely before decorating to avoid melting icing.
Nutrition
- Serving Size: 1 cookie cone
- Calories: 220
- Fat: 14
- Carbohydrates: 22
- Fiber: 2
- Protein: 5
Keywords: Halloween, peanut butter, chocolate chip, cookie cones, witch hat, easy treats, festive dessert



