Love this? Save it for later!
Share the inspiration with your friends
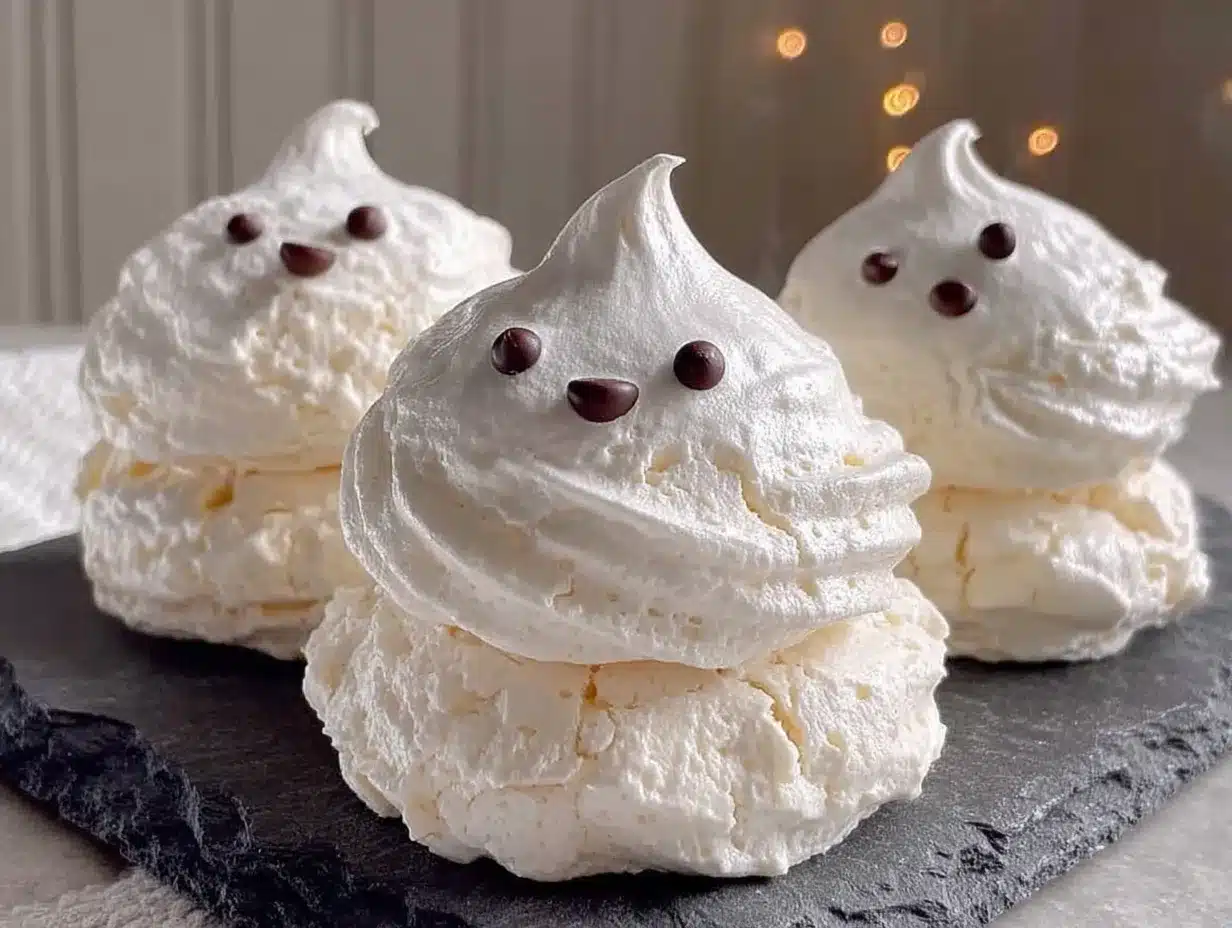
My neighbor wasn’t trying to impress anyone. I’d stopped by to borrow a whisk—mine had mysteriously vanished into the same kitchen drawer dimension where socks go in the dryer—and the smell of vanilla and sugar hit me before I even knocked. Through her kitchen window, I could see tiny white shapes lined up on a baking sheet, looking like a ghost convention had taken over her counter. She opened the door with flour on her nose and said, “Oh, these? They’re just meringues. My kid wanted Halloween cookies that don’t require a degree in pastry arts.”
She said it like it was nothing. Like she hadn’t just created the most adorable, ethereal little ghosts I’d ever seen. I stood there, whisk forgotten, watching her pipe these perfect little spirits onto parchment paper. Her three-year-old was “helping” by eating chocolate chips from a bowl, and the whole scene was so casually magical that I almost cried. Not kidding. There’s something about watching someone make something beautiful without trying that just gets you, you know?
I ended up staying for an hour. We drank coffee while the meringues baked low and slow, filling her tiny kitchen with that sweet, toasty vanilla aroma that makes you feel like everything’s going to be okay. She told me the recipe came from her grandmother, who made these every Halloween without fail. “She’d call them ‘kitchen ghosts,'” my neighbor laughed. “Said they were the only ghosts she wanted in her house.” Honestly, I get it now. These cozy ghost meringue cookies aren’t just a treat—they’re a little piece of comfort you can hold in your hand. And the best part? They only need three ingredients. Three! Maybe you’ve been there, scrolling through Pinterest at midnight, looking for Halloween recipes that won’t leave you weeping into a bowl of failed caramel. These ghosts are your answer.
Why You’ll Love This Recipe
Let me tell you why these little spirits have earned a permanent spot in my Halloween rotation. I’ve tested this recipe more times than I care to admit—through humidity, through dry winter air, through that one time my mixer decided to go on strike mid-peak. And every single time, these ghosts delivered.
- Only 3 Ingredients: Egg whites, sugar, and vanilla extract. That’s it. No specialty stores, no hunting down obscure extracts, no panic when the grocery store is out of something weird.
- Naturally Gluten-Free & Dairy-Free: These cookies are a safe bet for so many dietary needs. No butter, no flour, no complicated substitutions.
- Perfect for Halloween Parties: They look impressive on a dessert table, but they’re secretly the easiest thing you’ll make all season. Your guests will think you slaved away for hours.
- Kid-Friendly Activity: Piping ghosts is actually really forgiving. My niece made one that looked like a sad potato with eyes, and it was somehow the cutest thing on the tray.
- Make-Ahead Magic: These keep for weeks in an airtight container. You can prep them days before your party and just relax.
- Endlessly Customizable: Add cocoa powder for chocolate ghosts, a drop of food coloring for pastel spirits, or skip the chocolate faces entirely for plain vanilla clouds.
What makes this recipe different from every other meringue recipe out there? It’s the texture. Most meringue cookies are either rock-hard or chewy in the wrong way. These? They’re crisp on the outside, with a delicate, airy interior that melts the second it hits your tongue. The secret is in the sugar—using superfine sugar (or blitzing regular sugar in a food processor) creates a smoother, more stable meringue that holds its shape beautifully. I learned this the hard way after a batch of lumpy, weeping ghosts that looked less like spirits and more like sad jellyfish. Never again.
And honestly? These cookies have become my go-to when I need a little comfort. Something about piping those tiny faces and watching them bake into perfect little ghosts just soothes my soul. It’s Halloween magic without the stress.
What Ingredients You Will Need
This recipe keeps things beautifully simple. Each ingredient plays a crucial role, and I’ve learned a few tricks along the way to make sure your ghosts turn out perfect every time.
- 3 large egg whites (about 90g or ⅓ cup + 1 tablespoon) — Room temperature eggs whip up higher and more stable. I learned this after a disastrous attempt with cold eggs that took forever to foam. Let your eggs sit out for 30 minutes before starting. If you’re impatient (same), place them in a bowl of warm water for 5 minutes.
- ¾ cup superfine sugar (150g) — This is the game-changer. Regular granulated sugar works, but superfine dissolves faster and creates a smoother, glossier meringue. You can make your own by blitzing regular sugar in a food processor for 30 seconds. I use Domino superfine sugar when I’m being fancy, but the homemade version works perfectly.
- 1 teaspoon vanilla extract — Pure vanilla extract gives the best flavor, but imitation vanilla works in a pinch. I’ve also used vanilla bean paste for those gorgeous little vanilla specks, and it’s beautiful. Avoid vanilla emulsion unless you’re okay with a slight greasiness.
- Optional: ¼ teaspoon cream of tartar — Not strictly necessary, but it stabilizes the egg whites and helps prevent over-beating. If you don’t have it, a squeeze of lemon juice works too. I’ve made these without it plenty of times and they still turn out great.
- Optional: ¼ cup mini chocolate chips (about 40g) — For the faces. You can also use melted chocolate in a piping bag, but chocolate chips are easier for little hands to press in.
- Optional: Gel food coloring — A tiny drop of purple or orange gel food coloring creates pastel ghosts for a softer Halloween look. Avoid liquid food coloring—it adds too much moisture and can deflate your meringue.
Ingredient Selection Tips: Fresh eggs are your friend here. Older egg whites actually whip up better because they’re thinner, but I’ve found that eggs about a week old strike the perfect balance. If you’re buying eggs specifically for meringues, look for pasteurized egg whites in a carton—they work beautifully and save you from having to figure out what to do with all those yolks (custard, anyone?).
Substitution Guidance: For a vegan version, aquafaba (the liquid from a can of chickpeas) works surprisingly well. Use 3 tablespoons of aquafaba per egg white. The texture is slightly different—a bit chewier—but the ghosts still look adorable. I tested this for a friend’s dairy-free Halloween party, and honestly, nobody could tell the difference.
Equipment Needed
You don’t need a professional pastry kitchen for these ghosts. Here’s what you’ll need, along with some alternatives I’ve discovered through trial and error.
- Electric mixer (stand mixer or hand mixer) — Whisking by hand is possible but your arm will hate you. I’ve done it exactly once and my shoulder was sore for two days. A hand mixer works perfectly fine. If you’re using a stand mixer, the whisk attachment is your best friend.
- Large mixing bowl — Glass or metal works best. Plastic bowls can retain grease, which prevents egg whites from whipping properly. I learned this the hard way after a batch of flat, sad meringue that never peaked. Wash your bowl with hot soapy water and dry it thoroughly before starting.
- Piping bag with round tip (or a zip-top bag with the corner snipped) — I’ve used both. The piping bag gives you more control, but a zip-top bag works in a pinch. Just don’t fill it too full, or you’ll end up with meringue everywhere. Trust me on this.
- Baking sheet lined with parchment paper — Silicone mats work too, but parchment is easier to peel away from the finished cookies. Make sure your baking sheet is completely cool before piping—a hot sheet will start melting your meringue immediately.
- Food processor (optional) — For making superfine sugar from regular granulated sugar. A coffee grinder works too, but clean it thoroughly first unless you want coffee-flavored ghosts.
- Small offset spatula (optional) — For smoothing any rough edges on your ghosts. I use my finger sometimes—don’t judge me.
Budget-Friendly Options: Don’t have a piping bag? A sturdy zip-top bag with a tiny corner snipped off works beautifully. No electric mixer? You can whisk by hand, but invite a friend over to take turns. No food processor? Just use regular granulated sugar and beat the meringue a few minutes longer to ensure the sugar dissolves completely.
Preparation Method
Let’s make some ghosts! I’ve broken this down step by step, with all the little details I wish someone had told me when I first started making meringues.
- Preheat your oven to 200°F (93°C) and line a baking sheet with parchment paper. Yes, 200°F seems ridiculously low, but that’s the magic of meringues—they dry out slowly rather than bake. If your oven runs hot (mine does), set it to 190°F (88°C). An oven thermometer is worth its weight in gold here.
- Separate your eggs while they’re cold—the yolks are less likely to break. Separate each egg into a small bowl first, then add the white to your main mixing bowl. This way, if a yolk breaks, you haven’t ruined your entire batch. I’ve saved myself from disaster more times than I can count with this trick.
- Let the egg whites come to room temperature (about 30 minutes). Room temperature egg whites whip up higher and more stable. If you’re in a hurry, place the bowl in a warm water bath for 5 minutes, stirring gently. Don’t let any water get into the whites, though—even a drop of water can prevent them from whipping properly.
- Add cream of tartar (if using) to the egg whites. Start beating on medium speed until foamy, about 1 minute. You’re looking for small, uniform bubbles—like the foam on a latte. Don’t rush this stage.
- Gradually add the sugar, about 1 tablespoon at a time, while beating on medium-high speed. This should take about 2-3 minutes. Adding sugar too quickly can deflate your egg whites. I know it’s tempting to dump it all in, but patience pays off here.
- Add the vanilla extract once all the sugar is incorporated. Beat on high speed until stiff, glossy peaks form. This usually takes 5-7 minutes with a stand mixer, a bit longer with a hand mixer. You’ll know it’s ready when you lift the whisk and the meringue holds a firm peak that doesn’t droop. Also, rub a tiny bit between your fingers—if it feels gritty, the sugar hasn’t dissolved completely. Keep beating for another minute or two.
- Transfer the meringue to your piping bag. If you’re using a zip-top bag, place it in a tall glass and fold the edges over the rim—this makes filling it so much easier. Don’t overfill; about half full is perfect.
- Pipe the ghosts onto the prepared baking sheet. Hold the piping bag straight up and squeeze gently to form a round base, then lift slightly while continuing to squeeze to create a taller, tapered shape. Release pressure and pull up quickly to create a little peak on top. Leave about 1 inch between ghosts—they don’t spread much, but they need a little breathing room. If your ghosts look lumpy or uneven, don’t worry. Real ghosts aren’t perfect either.
- Add the faces (if using chocolate chips). Gently press two chocolate chips for eyes and one for a mouth into each ghost. Do this immediately after piping, before the meringue starts to form a skin. If you wait too long, the chocolate chips won’t stick and will fall off during baking. I learned this after a batch of faceless ghosts that looked more like fluffy clouds than spirits.
- Bake for 1.5 to 2 hours, or until the meringues are dry and easily peel off the parchment paper. Don’t open the oven door during the first hour—the temperature fluctuation can cause your ghosts to crack. After an hour, you can check them by gently touching one. It should feel dry and firm, not sticky. If it’s still soft, give them another 30 minutes.
- Turn off the oven and let the ghosts cool inside with the door slightly ajar for 1 hour. This gradual cooling prevents cracking and ensures they’re perfectly crisp all the way through. I usually leave them overnight if I’m making them the day before a party.
Cooking Tips & Techniques
After making these ghosts more times than I can count, I’ve collected a few tricks that make the process smoother and the results more reliable.
Perfect Peaks Every Time: The key to stable meringue is patience. Start slow, build up speed, and don’t rush the sugar addition. I once tried to speed things up by adding all the sugar at once, and my meringue never reached stiff peaks. It was a sad, soupy mess that I ended up turning into a frittata. Learn from my mistakes.
Humidity is Your Enemy: Meringues hate humidity. If it’s a rainy day, your cookies might turn out chewy instead of crisp. Wait for a dry day if possible, or run a dehumidifier in your kitchen. I live in a humid climate, so I’ve learned to bake these in the evening when humidity tends to be lower.
The Finger Test: Not sure if your sugar has dissolved completely? Rub a tiny bit of meringue between your thumb and forefinger. If it feels smooth, you’re good. If it’s gritty, keep beating. This simple test has saved me from countless batches of weeping meringues.
Don’t Over-Beat: There’s a fine line between stiff peaks and over-beaten meringue. Over-beaten meringue looks grainy and separated, and it won’t pipe smoothly. If you see your meringue starting to look curdled, stop immediately. You’ve gone too far. Unfortunately, there’s no saving over-beaten meringue—you’ll have to start over.
Piping Like a Pro: Hold your piping bag at a 90-degree angle to the baking sheet. Squeeze from the top, not the middle. Practice on a piece of parchment first if you’re nervous. I always pipe a few practice ghosts before committing to the real batch. It’s like stretching before a workout.
Storage Secrets: Once cooled completely, store your ghosts in an airtight container at room temperature. Don’t refrigerate them—the moisture will make them sticky. They’ll keep for up to 2 weeks, but honestly, they never last that long in my house.
Variations & Adaptations
One of the best things about this recipe is how easily it adapts. Here are some variations I’ve tried and loved.
Chocolate Ghosts: Replace 2 tablespoons of sugar with 2 tablespoons of unsweetened cocoa powder. Sift the cocoa powder with the sugar to avoid lumps. The result is a dark, moody ghost that looks like it’s been haunting a chocolate factory. I made these for a friend’s gothic Halloween party, and they were the first thing to disappear.
Pastel Spirits: Add a tiny drop of gel food coloring (purple, orange, or green) to the meringue during the final minute of beating. Fold gently to create a marbled effect, or beat until evenly colored. Pastel ghosts are perfect for a more whimsical, less spooky Halloween vibe. I made a batch of lavender ghosts for my niece’s birthday, and she thought they were fairy ghosts.
Peppermint Ghosts: Replace the vanilla extract with ½ teaspoon peppermint extract. Crush a few candy canes and sprinkle the pieces on top before baking. These are perfect for a Christmas-meets-Halloween party (yes, that’s a thing, and it’s amazing).
Vegan Aquafaba Ghosts: Use 9 tablespoons of aquafaba (the liquid from a can of chickpeas) instead of egg whites. Beat with ¼ teaspoon cream of tartar until foamy, then gradually add the sugar. The texture is slightly different—a bit chewier—but the ghosts are just as adorable. I tested this for a vegan friend, and she said they were the best meringues she’d had in years.
Spiced Ghosts: Add ½ teaspoon of pumpkin pie spice or cinnamon to the sugar before beating. These are perfect for fall gatherings and smell incredible while baking. I made a batch for Thanksgiving and served them alongside pumpkin pie. They were a hit.
Serving & Storage Suggestions
These ghosts are as versatile as they are adorable. Here’s how to serve and store them for maximum enjoyment.
Serving Temperature: Serve at room temperature. Cold meringues can feel a bit hard, and they lose some of their delicate texture. If you’ve stored them in the fridge (not recommended, but sometimes necessary), let them sit out for 10 minutes before serving.
Presentation Ideas: Arrange your ghosts on a platter with a few fake spider webs for a spooky effect. Or stick them into a bowl of chocolate pudding to make it look like ghosts are rising from a swamp. I’ve also tied them to gift bags with twine for a homemade Halloween treat that looks store-bought.
Complementary Dishes: These ghosts pair beautifully with hot chocolate, coffee, or a glass of cold milk. For a Halloween dessert board, arrange them alongside caramel apples, popcorn balls, and pumpkin cupcakes. They’re also lovely crumbled over ice cream for a crunchy topping.
Storage Instructions: Store in an airtight container at room temperature for up to 2 weeks. Separate layers with parchment paper to prevent sticking. Do not refrigerate—moisture will make them sticky and chewy. Do not freeze—they’ll absorb freezer odors and lose their crisp texture.
Flavor Development: Interestingly, these ghosts actually improve after a day or two. The flavors meld together, and the texture becomes perfectly crisp. I’ve found that day-old ghosts are actually better than freshly baked ones. So don’t stress about making them ahead of time—they’ll be even more delicious.
Nutritional Information & Benefits
Let’s be real—these are cookies, not health food. But they do have some surprising benefits.
Estimated Nutritional Values (per ghost, without chocolate chips):
- Calories: 25
- Fat: 0g
- Carbohydrates: 6g
- Sugar: 6g
- Protein: 0.5g
- Sodium: 10mg
Health Benefits: Egg whites are a good source of protein (about 3.5g per egg white) and contain zero fat or cholesterol. They’re also rich in selenium, which supports thyroid function. The sugar content is relatively low per cookie, especially compared to most Halloween treats. And since these are naturally gluten-free and dairy-free, they’re a safe option for many dietary restrictions.
Dietary Considerations: These ghosts are naturally gluten-free, dairy-free, and nut-free. For a vegan version, use aquafaba. For a lower-sugar version, you can reduce the sugar by 2 tablespoons, but the texture will be slightly less stable. For a keto version, use a sugar substitute like erythritol, but note that the texture will be different—more chewy than crisp.
Potential Allergens: Egg whites are the primary allergen in this recipe. If you have an egg allergy, the aquafaba version is a great alternative. The chocolate chips may contain dairy, so use dairy-free chocolate chips if needed.
My Personal Perspective: I love that these cookies let me enjoy a sweet treat without feeling overly indulgent. A single ghost satisfies my sugar craving without sending me into a sugar coma. Plus, they’re so light and airy that you feel like you’re eating a cloud. That’s a win in my book.
Conclusion
These cozy ghost meringue cookies have become more than just a Halloween recipe in my kitchen. They’re a reminder that sometimes the simplest things bring the most joy. Three ingredients. A little patience. And suddenly you’ve created something that makes people smile, that brings a touch of magic to an ordinary evening, that turns a simple gathering into a celebration.
I love how forgiving this recipe is. Your ghosts don’t need to be perfect—in fact, the imperfect ones are often the most charming. The lopsided ones, the ones with chocolate chip eyes that are slightly too big, the ones that look more like blobs than spirits—those are the ones that get the most compliments. There’s something beautiful about embracing imperfection, especially around Halloween.
So go ahead and give these a try. Experiment with flavors, colors, and decorations. Make them with your kids, your friends, or just for yourself on a quiet October evening. And when you do, I’d love to hear about it. Drop a comment below and tell me how your ghosts turned out. Did you try a variation? Did your kids come up with a new face design? Did you accidentally make a ghost that looks like your neighbor’s cat? Share your stories—I read every single comment, and they honestly make my day.
Happy haunting, friends. May your kitchen be filled with vanilla-scented spirits and your heart with cozy Halloween magic.
Frequently Asked Questions
Can I make these ghosts without a piping bag?
Absolutely! A zip-top bag with a tiny corner snipped off works perfectly. You can also use a spoon to drop small dollops of meringue onto the baking sheet and shape them gently with the back of the spoon. They won’t be as tall, but they’ll still be adorable.
Why did my meringue turn out flat and runny?
This usually happens for one of three reasons: your bowl or whisk had traces of grease, a bit of egg yolk got into the whites, or you added the sugar too quickly. Make sure your equipment is spotless, separate your eggs carefully, and add sugar gradually. If your meringue still won’t stiffen, you can try adding a pinch of cream of tartar to stabilize it.
How do I know when the meringues are done baking?
They’re done when they peel easily off the parchment paper and feel dry and firm to the touch. If they stick or feel soft, give them another 30 minutes. The low temperature means they dry out slowly, so it’s better to over-bake slightly than under-bake.
Can I use liquid food coloring instead of gel?
I don’t recommend it. Liquid food coloring adds too much moisture to the meringue, which can cause it to deflate or become sticky. Gel food coloring is much more concentrated and won’t affect the texture. If liquid coloring is all you have, use just a drop and expect slightly softer ghosts.
How long do these ghosts last?
Stored in an airtight container at room temperature, they’ll stay fresh for up to 2 weeks. Keep them away from moisture and heat, and don’t refrigerate them. If they start to feel sticky, you can pop them back in a 200°F oven for 10 minutes to re-crisp them.
Pin This Recipe!
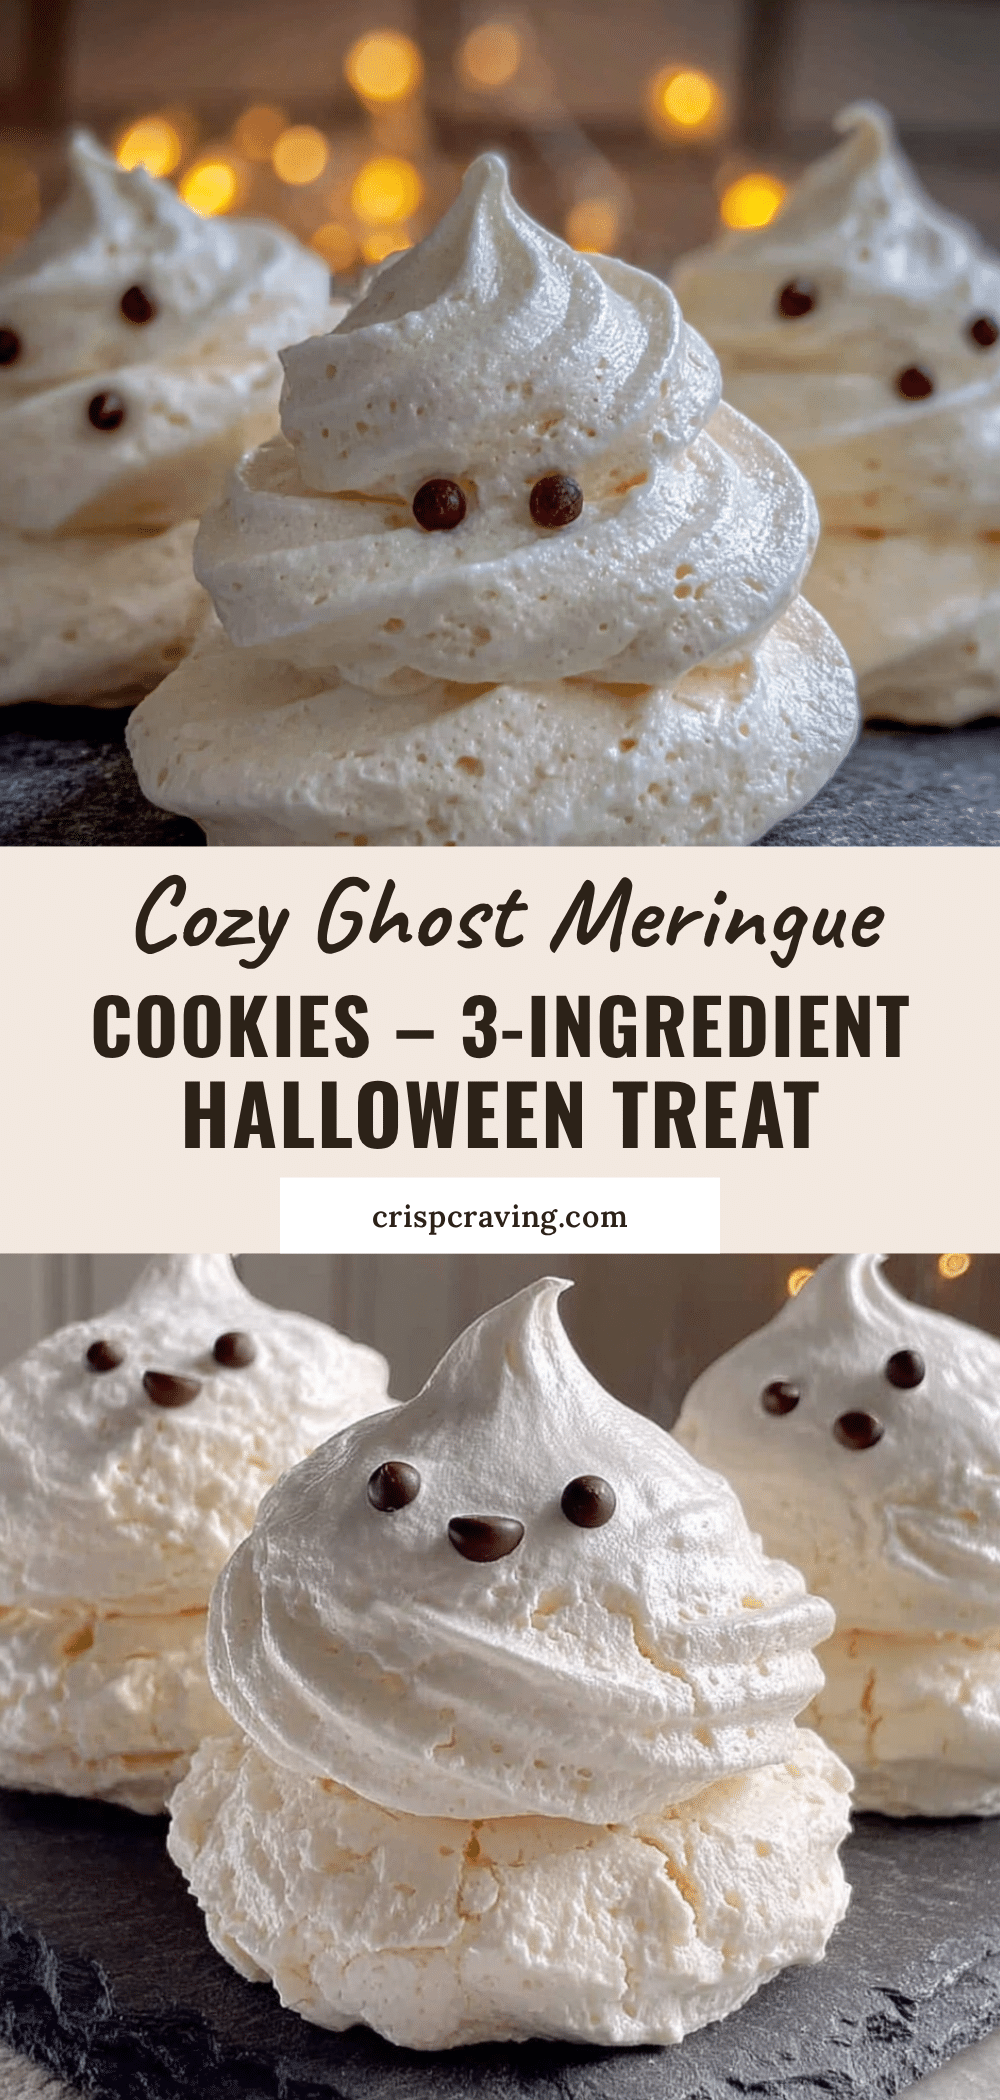
Cozy Ghost Meringue Cookies: Easy 3-Ingredient Halloween Treat
These adorable ghost meringue cookies are made with just 3 ingredients and are naturally gluten-free and dairy-free. Perfect for Halloween parties, they are crisp on the outside with a delicate, airy interior.
- Prep Time: 15 minutes
- Cook Time: 1.5 to 2 hours
- Total Time: 2 hours 15 minutes to 2 hours 45 minutes
- Yield: 24 servings 1x
- Category: Dessert
- Cuisine: American
Ingredients
- 3 large egg whites (about 90g or ⅓ cup + 1 tablespoon), room temperature
- ¾ cup superfine sugar (150g)
- 1 teaspoon vanilla extract
- Optional: ¼ teaspoon cream of tartar
- Optional: ¼ cup mini chocolate chips (about 40g)
- Optional: Gel food coloring
Instructions
- Preheat your oven to 200°F (93°C) and line a baking sheet with parchment paper.
- Separate your eggs while they’re cold, placing each white in a small bowl first, then add to your main mixing bowl.
- Let the egg whites come to room temperature (about 30 minutes).
- Add cream of tartar (if using) to the egg whites. Start beating on medium speed until foamy, about 1 minute.
- Gradually add the sugar, about 1 tablespoon at a time, while beating on medium-high speed. This should take about 2-3 minutes.
- Add the vanilla extract once all the sugar is incorporated. Beat on high speed until stiff, glossy peaks form, usually 5-7 minutes.
- Transfer the meringue to your piping bag.
- Pipe the ghosts onto the prepared baking sheet: hold the piping bag straight up and squeeze gently to form a round base, then lift slightly while continuing to squeeze to create a taller, tapered shape. Release pressure and pull up quickly to create a little peak on top. Leave about 1 inch between ghosts.
- Add the faces (if using chocolate chips): gently press two chocolate chips for eyes and one for a mouth into each ghost immediately after piping.
- Bake for 1.5 to 2 hours, or until the meringues are dry and easily peel off the parchment paper. Do not open the oven door during the first hour.
- Turn off the oven and let the ghosts cool inside with the door slightly ajar for 1 hour.
Notes
Use superfine sugar for a smoother, glossier meringue. Humidity can affect the texture; bake on a dry day if possible. Store in an airtight container at room temperature for up to 2 weeks. Do not refrigerate.
Nutrition
- Serving Size: 1 ghost
- Calories: 25
- Sugar: 6
- Sodium: 10
- Carbohydrates: 6
- Protein: 0.5
Keywords: Halloween cookies, meringue cookies, ghost cookies, 3-ingredient cookies, gluten-free cookies, dairy-free cookies, easy Halloween treat