Love this? Save it for later!
Share the inspiration with your friends
The oven timer beeped, and I pulled out a tray of what was supposed to be a simple chocolate cupcake. The batter looked fine going in. But somewhere in those twelve minutes, I grabbed the black cocoa powder instead of the regular Dutch-process stuff. I didn’t even realize it until I saw the cupcakes. They were almost black. Completely black. My first thought was panic, honestly. I had a seven-year-old and a five-year-old waiting to decorate, and I was sure these dark little cakes would freak them out. I almost threw the whole batch in the trash.
But then my daughter peered over the counter. “Whoa,” she whispered. “Those look like Halloween cupcakes.” And just like that, a disaster turned into a discovery. We had a tube of white frosting in the fridge and a plastic baggie with a snipped corner. I let the kids go wild making webs on top. They didn’t care that the cakes were supposed to be regular chocolate. They loved the creepy black color. I mean, they thought it was the coolest thing ever. You know that feeling when a mistake turns into something your kids remember for months? That was this moment.
These spiderweb cupcakes became our go-to for Halloween parties, classroom treats, and even just a random Tuesday when someone needs a little fun. The black cocoa gives them this deep, almost Oreo-like flavor that kids go crazy for. And the spiderweb design? It looks fancy but takes about two minutes per cupcake. Let me tell you, I’ve made peace with my kitchen blunders since that day. Sometimes the best recipes come from grabbing the wrong jar.
Why You’ll Love This Recipe
These spiderweb cupcakes are more than just a fun Halloween treat. They’re a practical solution for busy parents who want to make something special without losing their minds. Here’s why this recipe works so well for families:
- Budget-Friendly Ingredients: Black cocoa powder is the only specialty item, and a bag lasts for months. Everything else is pantry staples like flour, sugar, eggs, and butter. You won’t need a second mortgage for this batch.
- Quick Assembly: The cupcakes bake in 12-14 minutes. The spiderweb design takes maybe 10 minutes total. You can whip these up after school pickup and still have time for homework.
- Picky Eater Approved: That deep black color is actually a secret weapon. Kids think it’s cool and mysterious. They don’t care that it’s just a regular cupcake underneath. The Oreo-like flavor from black cocoa is mild and not too sweet.
- No Fancy Equipment: You need a piping bag or a zip-top bag. That’s it. No special tips, no fondant rollers, no complicated tools. If you can draw a spiral, you can make these.
- Leftovers Reheat Well: Make a double batch on Sunday. Store them in the fridge. They taste great for three or four days. The frosting stays soft, and the cake stays moist.
I’ve tested this recipe about six times now. The first batch was too dry. The second had too much cocoa. This version hits that sweet spot where the cake is tender but sturdy enough to hold the frosting. My neighbor, who is a professional baker, tried one and asked for the recipe. That’s when I knew I had something worth sharing.
These cupcakes are the kind that make your kid’s eyes light up. They’re the treat that gets you invited to the class party. And they’re simple enough that you can let your kids help without worrying about a huge mess. Honestly, that’s the best part.
What Ingredients You Will Need
This recipe uses simple, everyday ingredients to create something that looks impressive but doesn’t require a trip to a specialty store. The black cocoa powder is the star, but everything else is probably already in your pantry.
- All-purpose flour, 1 ½ cups (180g) – Standard white flour works best here. Don’t use bread flour or whole wheat, or the cupcakes will be dense.
- Black cocoa powder, ½ cup (50g) – This is the key ingredient. It’s different from regular cocoa. It has a darker color and a smoother, less acidic flavor. I prefer the brand Rodelle for the best color payoff. You can find it online or at some grocery stores near the baking aisle.
- Granulated sugar, 1 cup (200g) – Regular white sugar. You could use organic cane sugar if you prefer, but it might make the cupcakes slightly grainier.
- Baking soda, 1 teaspoon – This helps the cupcakes rise. Make sure it’s fresh. Test it by dropping a little into vinegar. If it fizzes, it’s good.
- Baking powder, ½ teaspoon – Adds extra lift for a lighter texture.
- Salt, ½ teaspoon – Balances the sweetness and enhances the cocoa flavor. Use fine sea salt for best results.
- Unsalted butter, ½ cup (113g), softened – Leave it on the counter for 30 minutes before starting. If you only have salted butter, reduce the added salt to ¼ teaspoon.
- Vegetable oil, ¼ cup (60ml) – Keeps the cupcakes moist. You can use canola or melted coconut oil instead.
- Large eggs, 2, room temperature – Cold eggs can make the batter lumpy. Place them in warm water for five minutes if you’re in a hurry.
- Vanilla extract, 2 teaspoons – Pure vanilla is best, but imitation works fine. Don’t skip it because it rounds out the cocoa flavor.
- Buttermilk, 1 cup (240ml) – This reacts with the baking soda to make the cupcakes tender. If you don’t have buttermilk, add 1 tablespoon of lemon juice or white vinegar to regular milk and let it sit for 5 minutes.
- Powdered sugar, 2 cups (240g) – For the frosting. Sift it if it’s lumpy.
- Unsalted butter, ½ cup (113g), softened – For the frosting. Make sure it’s truly soft, not melted.
- Heavy cream, 2-3 tablespoons (30-45ml) – Adjust the amount to get the right piping consistency. You can use milk in a pinch.
- Vanilla extract, 1 teaspoon – For the frosting.
- White gel food coloring, optional – Makes the spiderwebs pop. Liquid food coloring won’t work because it thins the frosting too much.
Equipment Needed
You don’t need a lot of fancy tools for these cupcakes. Here’s what I use when I make them:
- 12-cup muffin tin – Standard size works best. Don’t use mini or jumbo tins unless you adjust the baking time.
- Paper cupcake liners – I like using black or orange liners for Halloween, but white works fine too. The black cocoa batter can stain light liners, so keep that in mind.
- Mixing bowls – Two medium bowls. One for dry ingredients, one for wet.
- Electric hand mixer or stand mixer – A hand mixer is easier for small batches. If you use a stand mixer, use the paddle attachment.
- Rubber spatula – For scraping down the bowl and folding the batter.
- Cooling rack – Wire racks let air circulate so the cupcakes cool evenly. If you don’t have one, a clean dish towel works in a pinch.
- Piping bag or zip-top bag – A gallon-size zip-top bag works perfectly. You don’t need a special piping bag for this design.
- Small round piping tip – A Wilton #3 or #4 tip is ideal. But honestly, snipping a tiny corner off a zip-top bag works just as well.
- Toothpick – For dragging the frosting into spiderweb patterns. A wooden skewer works too.
I’ve learned the hard way that cheap zip-top bags can split open when you pipe thick frosting. Spend an extra dollar on the freezer-grade bags. They’re stronger and won’t burst mid-web.
Preparation Method
Let’s walk through this step by step. I’ve added some notes from my own trial and error so you don’t make the same mistakes I did.
- Preheat your oven to 350°F (175°C). Line your muffin tin with paper liners. This recipe makes exactly 12 standard cupcakes, so you don’t need to worry about extra batter.
- Whisk the dry ingredients together. In a medium bowl, combine the flour, black cocoa powder, baking soda, baking powder, and salt. Whisk until everything looks uniform. Black cocoa can be clumpy, so break up any lumps with the back of a spoon. Set this aside.
- Cream the butter and sugar. In a separate large bowl, beat the softened butter and granulated sugar together with an electric mixer on medium speed. Beat for about 3 minutes until the mixture looks light and fluffy. Scrape down the sides of the bowl halfway through. This step is important because it adds air to the batter, which helps the cupcakes rise.
- Add the oil, eggs, and vanilla. Beat in the vegetable oil, then add the eggs one at a time, beating well after each addition. Mix in the vanilla extract. The batter might look slightly separated at this point. That’s normal. Don’t panic.
- Alternate adding dry ingredients and buttermilk. With the mixer on low speed, add about one-third of the dry ingredients. Then add half of the buttermilk. Mix until just combined. Repeat with another third of the dry ingredients, then the remaining buttermilk, then the last of the dry ingredients. Stop mixing as soon as the flour disappears. Overmixing will make the cupcakes tough.
- Fill the cupcake liners. Use a cookie scoop or a spoon to divide the batter evenly among the 12 liners. Fill each about two-thirds full. The batter will be thick and dark, almost like black paint. That’s exactly how it should look.
- Bake for 12-14 minutes. Rotate the pan halfway through baking. The cupcakes are done when a toothpick inserted into the center comes out clean or with a few moist crumbs. Don’t overbake or they’ll be dry. Let them cool in the pan for 5 minutes, then transfer to a wire rack to cool completely. Do not frost warm cupcakes. The frosting will melt and slide right off.
- Make the frosting. While the cupcakes cool, beat the softened butter for the frosting in a medium bowl until smooth. Gradually add the powdered sugar, one cup at a time, beating on low speed. Add the vanilla extract and 2 tablespoons of heavy cream. Beat on medium-high for 2 minutes until the frosting is light and fluffy. If it’s too thick, add the remaining tablespoon of cream. If you want white webs, add a few drops of white gel food coloring and mix until uniform.
- Pipe the base layer. Transfer the frosting to a piping bag fitted with a small round tip. Pipe a flat spiral starting from the center of each cupcake and working outward. You want a solid layer of frosting on top. Don’t worry about making it perfect. The spiderweb design will cover any imperfections.
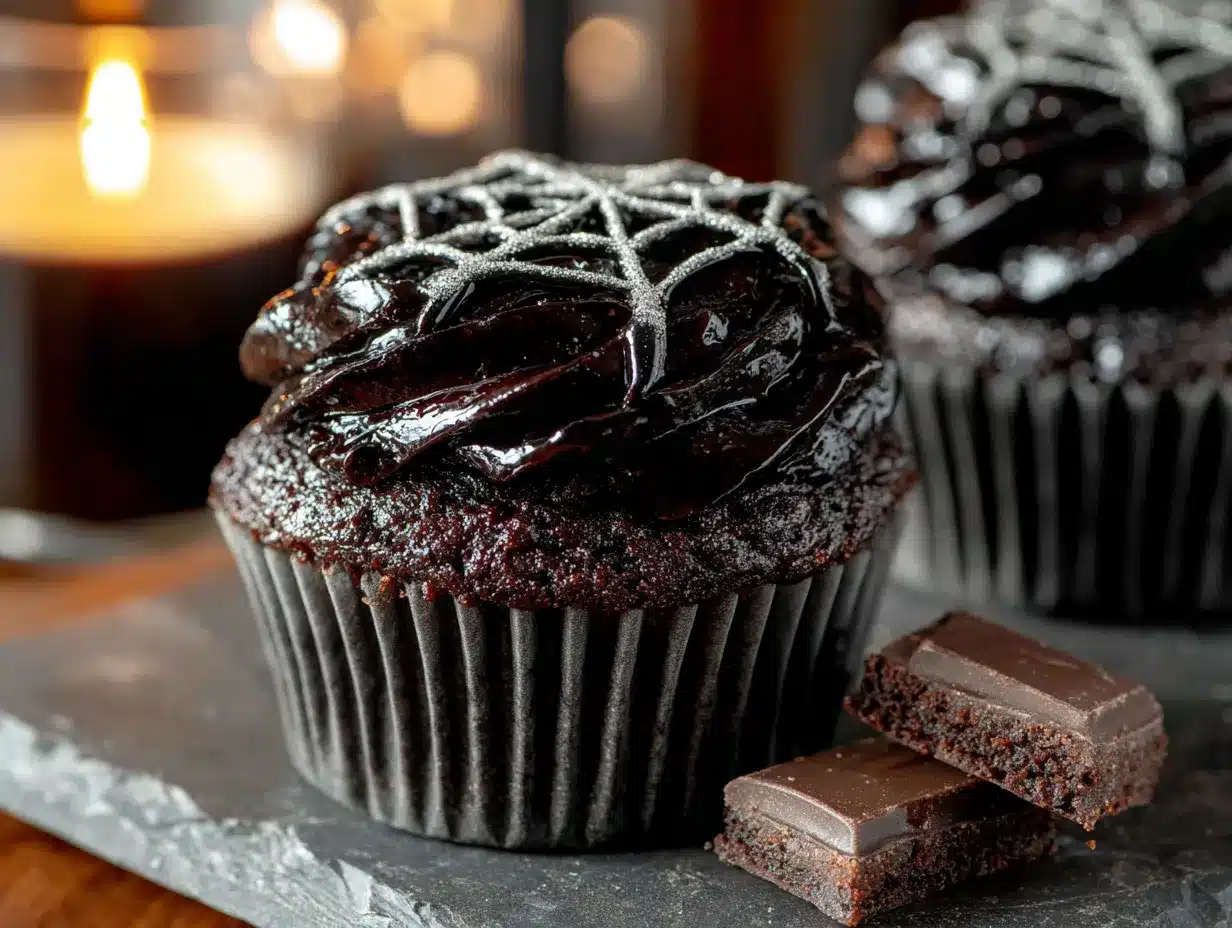
- Create the spiderweb pattern. This is the fun part. Using a toothpick or skewer, gently drag lines from the center of the frosting outward to the edge. Space the lines evenly, like spokes on a wheel. I usually do 8 lines. Then, starting from the center, drag the toothpick in a curved line between two spokes to create the web. Repeat, moving outward with each curved line. Wipe the toothpick clean between each drag for the best effect. It takes about 30 seconds per cupcake once you get the rhythm.
- Add a spider (optional). For extra fun, place a small candy spider or a chocolate chip on each cupcake. My kids love this part. You can also pipe a tiny spider using black frosting.
One thing I learned the hard way: don’t press too hard when dragging the toothpick. You want to move the frosting, not scrape it off the cupcake. Gentle pressure is all you need.
Cooking Tips & Techniques
I’ve made these cupcakes enough times to know where things can go wrong. Here are the biggest lessons I’ve learned:
Don’t overmix the batter. Black cocoa powder is very fine and can make the batter seem dry at first. It’s tempting to keep mixing until it looks smooth. But overmixing develops the gluten in the flour, which makes the cupcakes dense and rubbery. Mix just until you don’t see any more flour streaks. A few small lumps are fine.
Room temperature ingredients matter. Cold butter doesn’t cream properly. Cold eggs can seize the batter. Cold buttermilk won’t react well with the baking soda. Take everything out of the fridge 30 minutes before you start. If you forget, place the eggs in a bowl of warm water for 5 minutes and microwave the buttermilk for 15 seconds.
Black cocoa stains everything. I’m not kidding. It will turn your countertops gray, your dish towels black, and your clothes permanently dirty. Wear an apron. Wipe up spills immediately. Use a plastic or silicone spatula instead of a wooden one. I ruined a wooden spoon my first time, and it never fully came clean.
The spiderweb pattern takes practice. Your first cupcake might look messy. That’s okay. By the third one, you’ll have the hang of it. Start with the toothpick in the center and drag outward in a straight line. Then go back to the center and drag outward at a different angle. Repeat until you have 6-8 spokes. Then connect them with curved lines. Wipe the toothpick after each curved line for clean webs.
Multitask wisely. While the cupcakes bake, clean up your mixing bowls and make the frosting. While the cupcakes cool, set up your piping station. This saves time and keeps your kitchen from looking like a disaster zone.
Variations & Adaptations
These cupcakes are pretty flexible. Here are some ways I’ve changed them up depending on what I have on hand or who I’m feeding:
Gluten-Free Version: Substitute the all-purpose flour with a 1:1 gluten-free baking flour blend. I’ve used Bob’s Red Mill brand with good results. Add an extra tablespoon of buttermilk because gluten-free flours absorb more liquid. The texture will be slightly more crumbly, but the flavor is still great.
Dairy-Free Version: Use vegan butter sticks (not tub margarine) and replace the buttermilk with 1 cup of unsweetened almond milk mixed with 1 tablespoon of lemon juice. For the frosting, use vegan butter and canned coconut cream instead of heavy cream. The frosting will be a bit softer, so refrigerate the cupcakes after decorating.
Extra Spooky Version: Add ½ teaspoon of peppermint extract to the frosting for a “minty spiderweb” flavor. Or stir in some orange food coloring to make the webs look like they’re glowing. I once made a batch with black glitter sprinkles on top, and my kids thought they were magical.
Less Sweet Version: Reduce the granulated sugar to ¾ cup. The cupcakes will be slightly less tender, but the black cocoa flavor will shine through more. For the frosting, use only 1 ½ cups of powdered sugar. It won’t be as stiff, so pipe the webs carefully.
Chocolate Spider Version: Instead of white frosting, use chocolate buttercream for the webs. The contrast isn’t as dramatic, but the flavor is richer. You can also add a drop of black gel food coloring to the chocolate frosting for a darker web.
My personal favorite variation is adding a teaspoon of instant espresso powder to the dry ingredients. It doesn’t make the cupcakes taste like coffee. It just deepens the chocolate flavor. I discovered this by accident when I ran out of regular cocoa and needed a flavor boost. Now I do it every time.
Serving & Storage Suggestions
These cupcakes are best served at room temperature. The frosting stays soft, and the cake is perfectly moist. If you’ve refrigerated them, let them sit on the counter for 20 minutes before serving.
For a Halloween party, arrange the cupcakes on a black platter or a wooden board. Add some fake spiderwebs and plastic spiders around the edges for a themed presentation. My kids love helping with this part. It makes them feel like party planners.
These pair well with warm apple cider or a glass of cold milk. If you’re serving adults, a cup of black coffee or a dark stout beer complements the cocoa flavor beautifully.
Storage Instructions: Store leftover cupcakes in an airtight container at room temperature for up to 2 days. If your kitchen is warm, refrigerate them to keep the frosting from getting too soft. They’ll last in the fridge for up to 5 days. The texture stays surprisingly good.
Freezing Instructions: You can freeze the unfrosted cupcakes for up to 3 months. Wrap each one tightly in plastic wrap, then place them in a freezer bag. Thaw at room temperature for about an hour before frosting. I don’t recommend freezing frosted cupcakes because the spiderweb design smudges during thawing.
Reheating Tips: If you want a warm cupcake, microwave one for 10-15 seconds. The frosting will get slightly melty, which some people love. Just don’t overdo it, or the cake will dry out.
One thing I’ve noticed: the flavors actually improve after a day in the fridge. The black cocoa mellows out, and the cake becomes more tender. So don’t worry if you make these a day ahead. They might even taste better.
Nutritional Information & Benefits
These cupcakes are a treat, not a health food. But I’ve included the estimated nutritional values so you can plan accordingly. One cupcake (with frosting) contains approximately:
- Calories: 320
- Fat: 16g
- Carbohydrates: 44g
- Protein: 4g
- Sugar: 30g
- Fiber: 2g
Health Benefits of Black Cocoa: Black cocoa powder is made from cocoa beans that have been heavily alkalized. This process reduces the acidity and makes the cocoa smoother. It also retains some antioxidants, though less than natural cocoa. The good news is that black cocoa has a richer flavor, so you can use less sugar overall compared to regular chocolate recipes.
Dietary Considerations: This recipe contains gluten, dairy, and eggs. It is not suitable for vegans or those with celiac disease without modifications. See the variations section for gluten-free and dairy-free options.
Potential Allergens: Wheat, milk, eggs. If you’re serving these at a school party, check with other parents about allergies first. I always make a note on the serving platter.
Look, I’m not a nutritionist. I’m a mom who likes to bake. These cupcakes are for special occasions. They’re for the Halloween party, the classroom celebration, the Friday night movie. Enjoy them without guilt, and don’t overthink the numbers.
Conclusion
These black cocoa spiderweb cupcakes started as a mistake in my kitchen. Now they’re a tradition in our house. Every October, my kids ask when we’re making “the black cupcakes.” And every time I pull that bag of black cocoa powder out of the pantry, I smile at how a wrong turn turned into something so right.
What I love most about this recipe is how it brings people together. My kids decorate their own webs, and each one is different. Some are neat. Some are messy. All of them are perfect because they made them themselves. That’s the kind of kitchen memory that sticks with you.
I hope you try these with your family. Don’t worry if the first web looks a little wonky. Your kids won’t care. They’ll just be thrilled to eat something that looks like it came from a haunted bakery. And honestly, that’s the whole point.
If you make these, I’d love to hear how they turned out. Leave a comment below or tag me in your photos. Share your spiderweb designs, your kitchen disasters, your happy accidents. That’s what makes this community so special.
Now go preheat your oven. Those spiderwebs aren’t going to make themselves.
Frequently Asked Questions
Can I use regular cocoa powder instead of black cocoa?
Yes, but the cupcakes won’t be as dark. Regular cocoa will give you a medium-brown color. The flavor will also be more acidic and less like Oreo cookies. If you use regular cocoa, reduce the amount to ⅓ cup because it’s more potent.
Why did my cupcakes turn out dry?
Overbaking is the most common cause. Check your cupcakes at 12 minutes. Every oven runs differently. Also, make sure you measured the flour correctly. Spoon it into the measuring cup and level it off. Scooping directly from the bag packs the flour and makes the cupcakes dry.
Can I make the batter ahead of time?
I don’t recommend it. The baking soda starts reacting as soon as it hits the buttermilk. If you let the batter sit too long, the cupcakes won’t rise properly. Bake them immediately after mixing. You can freeze the baked cupcakes and frost them later.
How do I get the spiderweb pattern to look clean?
Wipe your toothpick clean after every drag. If you don’t, the frosting smears and the lines look blurry. Also, use gentle pressure. You’re moving the frosting, not scraping it off. Practice on one cupcake first. The rest will come naturally.
Can I use store-bought frosting instead of homemade?
You can, but homemade frosting is much easier to pipe and holds its shape better. Store-bought frosting is too soft for clean spiderweb lines. If you must use it, refrigerate it for 15 minutes first to firm it up. Add a few tablespoons of powdered sugar to thicken it if needed.
Pin This Recipe!
Easy Black Cocoa Spiderweb Cupcakes for Kids
These spooky spiderweb cupcakes feature deep black cocoa cake with a creamy white frosting web. A happy accident turned into a family favorite Halloween treat that’s simple enough for kids to help decorate.
- Prep Time: 15 minutes
- Cook Time: 14 minutes
- Total Time: 45 minutes
- Yield: 12 cupcakes 1x
- Category: Dessert
- Cuisine: American
Ingredients
- 1 ½ cups (180g) all-purpose flour
- ½ cup (50g) black cocoa powder
- 1 cup (200g) granulated sugar
- 1 teaspoon baking soda
- ½ teaspoon baking powder
- ½ teaspoon salt
- ½ cup (113g) unsalted butter, softened
- ¼ cup (60ml) vegetable oil
- 2 large eggs, room temperature
- 2 teaspoons vanilla extract
- 1 cup (240ml) buttermilk
- 2 cups (240g) powdered sugar
- ½ cup (113g) unsalted butter, softened (for frosting)
- 2–3 tablespoons (30-45ml) heavy cream
- 1 teaspoon vanilla extract (for frosting)
- White gel food coloring (optional)
Instructions
- Preheat oven to 350°F (175°C). Line a 12-cup muffin tin with paper liners.
- In a medium bowl, whisk together flour, black cocoa powder, baking soda, baking powder, and salt. Set aside.
- In a large bowl, beat softened butter and granulated sugar with an electric mixer on medium speed until light and fluffy, about 3 minutes. Scrape down the bowl halfway through.
- Beat in vegetable oil, then add eggs one at a time, beating well after each addition. Mix in vanilla extract.
- With mixer on low speed, add dry ingredients in three additions, alternating with buttermilk, beginning and ending with dry ingredients. Mix until just combined; do not overmix.
- Divide batter evenly among the 12 liners, filling each about two-thirds full.
- Bake for 12-14 minutes, rotating the pan halfway through, until a toothpick inserted in the center comes out clean or with a few moist crumbs. Cool in pan for 5 minutes, then transfer to a wire rack to cool completely.
- For frosting: Beat softened butter until smooth. Gradually add powdered sugar, beating on low speed. Add vanilla extract and 2 tablespoons heavy cream; beat on medium-high for 2 minutes until fluffy. Add more cream if needed. Stir in white gel food coloring if desired.
- Transfer frosting to a piping bag fitted with a small round tip. Pipe a flat spiral from the center of each cupcake outward to cover the top.
- Using a toothpick or skewer, gently drag lines from the center outward to create 6-8 spokes. Then drag curved lines between spokes to form a web, wiping the toothpick clean between each drag.
- Optional: Place a candy spider or chocolate chip on each cupcake for decoration.
Notes
Don’t overmix the batter; black cocoa can make it seem dry but overmixing leads to dense cupcakes. Room temperature ingredients are important for proper creaming and reaction. Black cocoa stains surfaces, so wear an apron and clean spills immediately. The spiderweb pattern takes practice; wipe the toothpick clean after each drag for best results. Cupcakes can be stored in an airtight container at room temperature for up to 2 days or refrigerated for up to 5 days. Unfrosted cupcakes can be frozen for up to 3 months.
Nutrition
- Serving Size: 1 cupcake
- Calories: 320
- Sugar: 30
- Sodium: 280
- Fat: 16
- Saturated Fat: 9
- Carbohydrates: 44
- Fiber: 2
- Protein: 4
Keywords: spiderweb cupcakes, black cocoa cupcakes, Halloween cupcakes, easy kids recipe, chocolate cupcakes, spiderweb design



