Love this? Save it for later!
Share the inspiration with your friends
This was supposed to be a batch of regular Rice Krispie treats for a classroom Halloween party. I had the marshmallows melting, the butter bubbling, and I was already mentally checking out, thinking about the mountain of laundry waiting for me at home. Then my neighbor knocked on the door, holding a bag of those pretzel sticks she’d bought for a recipe she never got around to making. “Here,” she said, thrusting them into my hands. “Use these for something.” I grabbed the bag, thanked her, and shut the door. I had zero idea what I was going to do with them. I mean, pretzel sticks and Rice Krispie treats? That combo felt weird, even for me.
I stared at the pot of melted marshmallows, then at the pretzels, then back at the pot. Honestly, my brain was fried. It was a Tuesday, I was running on three cups of coffee, and I just needed to get these treats done. So, on a whim, I dipped the end of a pretzel stick into the marshmallow mixture, rolled it in some crushed cereal, and stuck it on a piece of wax paper. It looked ridiculous. Like a sad, sticky lollipop. I almost threw it away. But something made me keep going. Maybe it was the stubborn part of me that refuses to waste food. Maybe it was the desperate hope that this little experiment would save me from another trip to the store.
An hour later, I had a whole tray of these things. They looked nothing like the elegant, Pinterest-perfect treats I’d been imagining. They were lopsided, the marshmallow coating was uneven, and some of the pretzel sticks were sticking out at weird angles. But you know that feeling when you take a bite of something and you just know? The crunch of the pretzel, the soft chew of the marshmallow, the snap of the cereal—it was honestly better than anything I could have planned. These messy little broomsticks became the hit of the party. The kids went crazy for them, and the parents kept asking for the recipe. I just smiled and said, “Oh, it’s a family secret.” But really, it was just a happy accident born from a distracted Tuesday and a neighbor with a bag of pretzels. This is the recipe that taught me to stop panicking when things go wrong in the kitchen. Sometimes, the best treats are the ones you stumble into.
Why You’ll Love This Recipe
Let’s be real for a second. Halloween treats can be a total headache. You’ve got the complicated cookie decorations, the finicky chocolate molds, and the sheer amount of time they eat up. These Easy No-Bake Halloween Rice Krispie Broomsticks are the exact opposite of all that. They are the recipe you turn to when you want something impressive without the stress. I’ve tested this method more times than I can count, tweaking the marshmallow-to-cereal ratio until it was just right. This is the version that works every single time, even on a rushed weeknight.
- Quick & Easy: From start to finish, you’re looking at about 20 minutes of active work. The hardest part is waiting for them to set, which takes no effort on your part.
- Simple Ingredients: You likely have everything in your pantry right now. Marshmallows, butter, Rice Krispies cereal, and pretzel sticks. No fancy baking supplies required.
- Perfect for Halloween Parties: These are the ultimate crowd-pleaser for school events, office parties, or just a fun night in. Kids love the broomstick shape, and adults appreciate the nostalgic flavor.
- No Oven Required: It’s a no-bake recipe. That means no preheating, no watching the oven, and no melting in a hot kitchen. Just a stovetop or microwave, and you’re good to go.
- Unbelievably Delicious: The combination of salty pretzel, sweet marshmallow, and crunchy cereal is pure magic. It’s that perfect balance of textures and flavors that keeps you reaching for just one more.
What makes this recipe different from all the other versions out there? It’s the technique. I figured out that letting the marshmallow mixture cool for just a minute before dipping the pretzels makes a huge difference. It prevents the coating from being too sticky and runny, giving you a much cleaner, more manageable broomstick. This isn’t just another Halloween treat—it’s your best version. It’s the kind of recipe that makes you close your eyes after the first bite, because it’s comfort food reimagined. It’s faster, simpler, but with the same soul-soothing satisfaction. Perfect for impressing guests without stress, or turning a simple Tuesday into something memorable.
What Ingredients You Will Need
This recipe uses a handful of simple, wholesome ingredients to deliver big flavor and a satisfying crunch without any fuss. These are pantry staples you can pick up at any grocery store, making this a truly last-minute-friendly treat.
- 3 tablespoons unsalted butter (I use Land O’Lakes for its consistent richness. Adds that classic buttery flavor to the marshmallow base.)
- 1 package (10 ounces) regular marshmallows (About 40 large marshmallows. Mini marshmallows work too, just measure out 4 cups. Jet-Puffed is my go-to brand for reliable melting.)
- 6 cups Rice Krispies cereal (Make sure it’s fresh and not stale for the best crunch. Generic brands work fine, but the texture might be slightly different.)
- 30 to 36 pretzel sticks (Look for standard-sized pretzel sticks, not the thin ones. They need to be sturdy enough to hold the marshmallow coating. I like Snyder’s of Hanover for their consistent saltiness.)
- Optional: 1/4 cup candy melts or chocolate chips (For attaching a “bristle” detail or just drizzling on top. Wilton candy melts are easy to work with.)
- Optional: Green or black licorice strings (For tying around the broomstick to look like a “twine” detail. Cut them into small pieces.)
Ingredient Selection Tips: For the best results, use fresh marshmallows. Stale marshmallows can be harder to melt and might result in a grainy texture. If you’re looking for a slightly less sweet version, you can use a high-quality salted butter to balance the flavors. For a gluten-free option, make sure your pretzel sticks are certified gluten-free, as many brands use wheat flour. I’ve also made these with gluten-free Rice Krispies, which are widely available now.
Substitution Guidance: You can easily swap the butter for a dairy-free alternative like vegan butter or coconut oil. The flavor will change slightly, but it still works beautifully. If you’re out of Rice Krispies, try using any puffed rice cereal or even crushed cornflakes for a different texture. Just know that the crunch factor will vary. For a fun twist, add a teaspoon of vanilla extract or a pinch of cinnamon to the melted marshmallow mixture. It adds a lovely depth of flavor that complements the salty pretzel perfectly.
Equipment Needed
You don’t need a fancy kitchen to pull these off. Here’s what you’ll need to make these broomsticks without a hitch.
- Large saucepan or pot: A 4-quart or larger pot is ideal for melting the butter and marshmallows without spilling. I’ve used my trusty Calphalon pot for years, and it works perfectly.
- Wooden spoon or silicone spatula: For stirring the marshmallow mixture. A silicone spatula is great because it won’t scratch your pot and it’s easy to scrape every last bit of sticky goodness.
- Large mixing bowl: For combining the cereal and marshmallow mixture. A metal or glass bowl works best.
- Wax paper or parchment paper: For lining your baking sheet. This is crucial for preventing the broomsticks from sticking. Parchment paper is my preference because it’s a bit more durable.
- Baking sheet or large tray: To hold the broomsticks while they set. A standard 13×18 inch sheet pan is perfect.
- Small bowl (optional): For melting candy melts or chocolate, if you choose to use them.
- Sharp knife or kitchen shears: For cutting licorice strings, if you’re using them for decoration.
Budget-Friendly Options: Don’t have a large saucepan? A deep skillet or even a large microwave-safe bowl will work. You can melt the butter and marshmallows in the microwave in 30-second bursts, stirring in between. Just be careful not to overheat them. And if you don’t have a wooden spoon, a regular metal spoon works fine—just be prepared for a bit more sticking.
Preparation Method
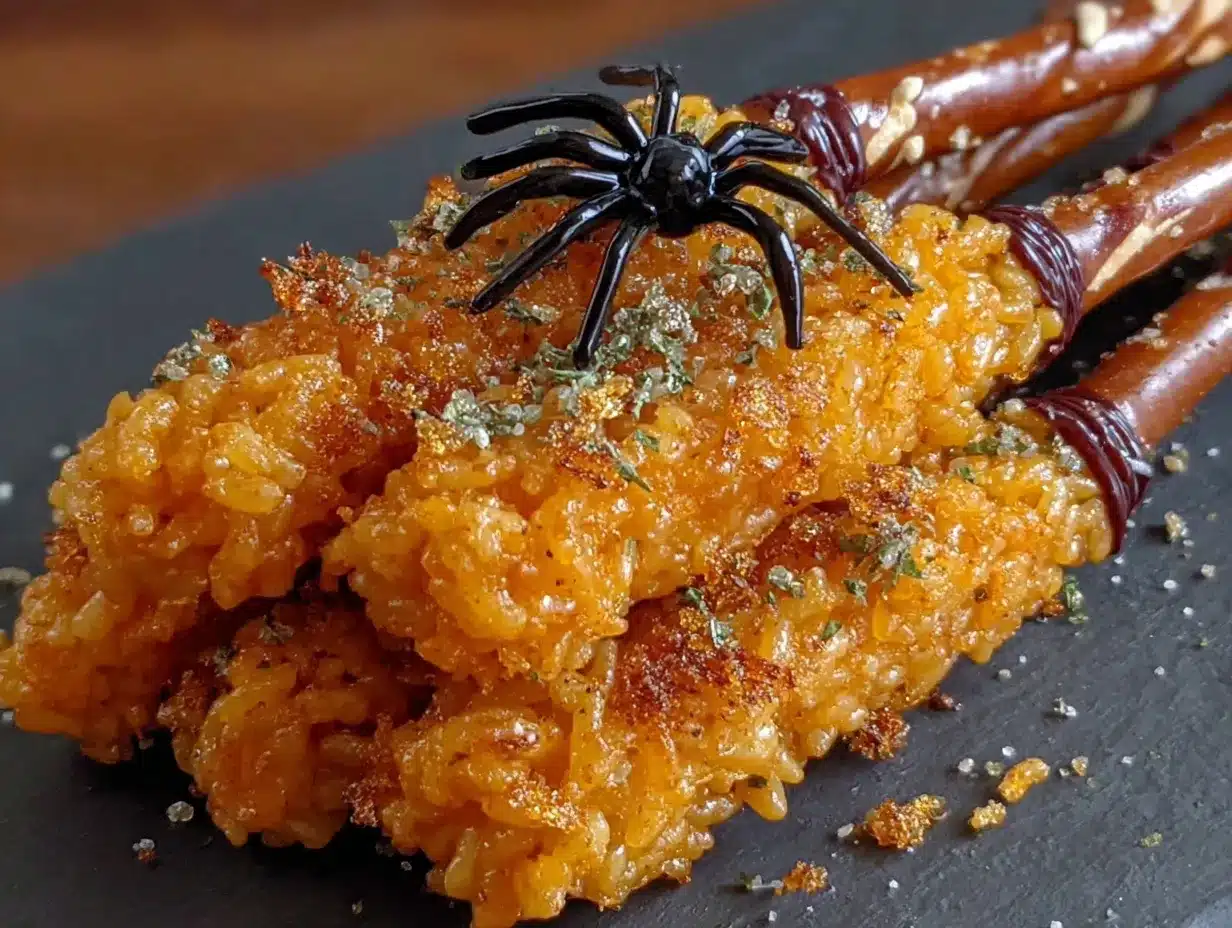
Alright, let’s get to the fun part. Follow these steps carefully, and you’ll have a batch of adorable broomsticks in no time.
- Prepare your workspace. Line a large baking sheet with wax paper or parchment paper. Set it aside. Have your pretzel sticks ready and within reach. This is a hands-on recipe, so you want everything close by. (Prep time: 2 minutes)
- Melt the butter. In a large saucepan, melt the 3 tablespoons of unsalted butter over medium-low heat. Stir it occasionally with your wooden spoon. You want it fully melted but not browned. If it starts to sizzle too much, turn the heat down. (Cook time: 2-3 minutes)
- Add the marshmallows. Pour the entire package of marshmallows into the pot with the melted butter. Stir constantly until the marshmallows are completely melted and the mixture is smooth and glossy. This usually takes about 5 to 7 minutes. Don’t walk away—stirring is key to prevent scorching. The mixture will look a bit like a thick, sticky sauce. (Cook time: 5-7 minutes)
- Remove from heat and cool slightly. Take the pot off the burner. Let it sit for 1 to 2 minutes. This is the secret step! If you add the cereal right away, the mixture is too hot and the cereal can get soggy. Letting it cool just a bit helps the coating stay light and crunchy. (Rest time: 1-2 minutes)
- Add the cereal. Pour the 6 cups of Rice Krispies cereal into the pot. Use a folding motion with your spatula to gently combine the cereal with the marshmallow mixture. Be careful not to crush the cereal. You want it evenly coated but still maintaining its shape. It will look like a sticky, lumpy mess—that’s perfect. (Prep time: 2-3 minutes)
- Shape the broomsticks. Here’s where the magic happens. Take a pretzel stick and dip one end into the marshmallow-cereal mixture. Use your fingers to gently press the mixture around the end of the pretzel, forming a small, broom-like shape. It doesn’t have to be perfect. A little lopsidedness adds character. The coated end should be about 1 to 1.5 inches long. Place the finished broomstick on the prepared baking sheet. Repeat with the remaining pretzel sticks and mixture. You’ll get about 30 to 36 broomsticks, depending on how much coating you use on each one. (Prep time: 10-15 minutes)
- Let them set. Once all the broomsticks are on the sheet, let them sit at room temperature for about 30 minutes. The coating will firm up as it cools. Don’t rush this step. If you try to move them too soon, they might fall apart. (Set time: 30 minutes)
- Add optional decorations. If you’re using candy melts or chocolate, melt them in a small bowl according to the package directions. Dip the end of the broomstick (the “bristle” part) in the melted chocolate for a fun detail. Or, cut small pieces of licorice string and tie them around the broomstick to look like twine. Let any decorations set for another 10 minutes. (Prep time: 10 minutes)
Sensory Cue: When you dip the pretzel into the marshmallow mixture, you should feel a slight resistance. The mixture should be sticky but not runny. If it’s too runny, let it cool for another minute. If it’s too stiff, you can reheat it gently over low heat for a few seconds.
Troubleshooting Tip: If the mixture gets too hard to work with while you’re shaping, simply place the pot back on the stove over very low heat for 30 seconds. Stir it until it softens slightly. Don’t overheat it, or it will become too sticky again.
Cooking Tips & Techniques
After making these broomsticks more times than I care to admit, I’ve picked up a few tricks that make the process smoother. Let me share them with you.
The Marshmallow Meltdown: The biggest mistake I made the first time was rushing the marshmallow melting. I cranked up the heat thinking it would be faster. Big mistake. The marshmallows scorched on the bottom, and the whole batch tasted burnt. Always use medium-low heat and stir constantly. Patience is your friend here. A slow, even melt gives you a smooth, glossy coating that sticks to the cereal perfectly.
Keep Your Hands Sticky-Free: This is a messy job. Your fingers are going to get coated in marshmallow goo. The best trick I’ve learned? Lightly grease your hands with a little butter or cooking spray before you start shaping the broomsticks. It makes a world of difference. The mixture won’t stick to your fingers, and you can shape the broomsticks much more easily. Just don’t overdo it—a tiny bit goes a long way.
The Timing Game: The marshmallow mixture sets quickly as it cools. That’s why I recommend working in small batches if you’re making a large quantity. You can keep the pot of mixture on a very low heat (like a warm burner) to keep it pliable while you work. Just stir it occasionally to prevent it from burning on the bottom. This multitasking strategy saves you from having to reheat the mixture halfway through.
The Perfect Broomstick Shape: You don’t need to be a sculptor. A simple, slightly flattened oval shape at the end of the pretzel is all you need. I’ve found that pressing the mixture gently with my thumb and forefinger gives it a more natural, broom-like look. Don’t worry about making them all identical—the charm of homemade treats is their little imperfections. Some of my best-looking broomsticks were the ones I thought were total messes.
Variations & Adaptations
One of the best things about this recipe is how easy it is to tweak. Here are a few variations I’ve tried and loved.
- Chocolate Lovers’ Broomsticks: After the broomsticks have set, melt some dark or milk chocolate and drizzle it over the top. I like to add a sprinkle of sea salt on top of the chocolate for a sweet-salty combo that’s absolutely addictive. You can also dip the entire “bristle” end in melted chocolate for a richer treat.
- Peanut Butter Twist: Add 2 tablespoons of creamy peanut butter to the marshmallow mixture while it’s melting. Stir until it’s fully incorporated. The peanut butter adds a savory, nutty flavor that pairs perfectly with the salty pretzel. Just be aware that this version is a bit softer and might need an extra 10 minutes to set.
- Spooky Halloween Colors: Add a few drops of orange or purple food coloring to the melted marshmallow mixture before adding the cereal. It gives the broomsticks a fun, festive look. I’ve also used black food coloring for a more dramatic effect. Just be careful not to add too much, or it can make the mixture a bit greasy.
- Gluten-Free Version: This is super easy. Just use certified gluten-free pretzel sticks and gluten-free puffed rice cereal. I’ve tested this with several brands, and they all work perfectly. The texture is slightly different—a bit more delicate—but the flavor is just as good.
- Vegan Adaptation: Use vegan butter and vegan marshmallows (like Dandies brand). The process is exactly the same. The vegan marshmallows can take a little longer to melt, so be patient. The final product is just as delicious and perfect for anyone with dietary restrictions.
Serving & Storage Suggestions
These broomsticks are best served at room temperature. The coating is firm but still has that soft, chewy marshmallow texture, and the pretzel stays perfectly crunchy. I like to arrange them on a platter with the “bristle” ends pointing outward, like a little broomstick bouquet. It makes for a fun presentation at Halloween parties.
Complementary Dishes: These pair wonderfully with a warm cup of apple cider or a glass of cold milk. If you’re serving them at a party, they look great next to a bowl of popcorn balls or some pumpkin-shaped cookies. For a more indulgent spread, serve them alongside a chocolate fondue for dipping.
Storage Instructions: Store any leftover broomsticks in an airtight container at room temperature. They will stay fresh for up to 5 days. Do not refrigerate them—the moisture in the fridge can make the marshmallow coating sticky and the pretzel soggy. If you live in a humid climate, you might want to add a piece of parchment paper between layers to prevent them from sticking together.
Freezer Tips: You can freeze these broomsticks for up to 2 months. Place them in a single layer on a baking sheet and freeze for an hour, then transfer them to a freezer-safe bag or container. To thaw, simply let them sit at room temperature for about 15 minutes. The texture will be slightly softer after freezing, but they’re still delicious. I’ve even eaten them straight from the freezer—they’re like a crunchy, cold treat.
Flavor Development: Honestly, these are best the day you make them. The pretzel is at its crunchiest, and the marshmallow coating is at its softest. That said, they’re still really good the next day. The flavor melds together a bit, and the marshmallow becomes a tad chewier. If you’re making them for a party, I recommend making them the night before and storing them in an airtight container. They’ll be perfect by party time.
Nutritional Information & Benefits
Let’s be honest—these are a treat, not a health food. But that doesn’t mean they can’t be part of a balanced diet. Here’s a rough estimate of the nutritional values per broomstick (based on 32 servings, without optional decorations).
| Nutrient | Amount per Broomstick |
|---|---|
| Calories | 95 |
| Total Fat | 2.5g |
| Saturated Fat | 1.5g |
| Cholesterol | 5mg |
| Sodium | 110mg |
| Total Carbohydrates | 18g |
| Dietary Fiber | 0g |
| Total Sugars | 9g |
| Protein | 1g |
Health Benefits: While not a superfood, these broomsticks do offer a few small positives. The Rice Krispies cereal is fortified with iron and B vitamins, which are important for energy metabolism. The butter provides a small amount of vitamin A. And the pretzel sticks offer a bit of sodium, which can help with electrolyte balance—especially if you’ve been running around all day preparing for Halloween. Plus, making them at home means you control the ingredients, avoiding any artificial preservatives or high-fructose corn syrup that you might find in store-bought treats.
Dietary Considerations: This recipe contains gluten (from the pretzel sticks and cereal), dairy (from the butter), and is not vegan. However, as mentioned in the variations section, it’s easy to adapt for gluten-free and vegan diets. Always check your ingredient labels for potential allergens, especially if you’re serving a crowd.
Conclusion
These Easy No-Bake Halloween Rice Krispie Broomsticks are the kind of recipe that makes you look like a kitchen wizard without any of the actual wizardry. They’re fun, they’re fast, and they’re ridiculously delicious. I love them because they remind me that sometimes the best things in life come from happy accidents. That neighbor with the bag of pretzels? She still doesn’t know she inspired a whole Halloween tradition in my house.
I really hope you give these a try. Don’t stress about making them perfect. Let them be a little lopsided. Let them be a little messy. That’s part of their charm. And if you come up with your own fun variation—maybe you add some sprinkles or use a different type of cereal—I’d love to hear about it. Drop a comment below and tell me how yours turned out. Share this post with a friend who needs a last-minute Halloween treat idea. And remember, the kitchen is for experimenting. Sometimes, the best recipes are the ones you never planned to make.
Frequently Asked Questions
Can I use mini marshmallows instead of regular ones?
Yes, absolutely. Mini marshmallows melt faster and more evenly, which can be a big help. Just measure out about 4 cups of mini marshmallows to replace one 10-ounce bag of regular marshmallows. The texture will be very similar.
My marshmallow mixture is too sticky. What did I do wrong?
This usually happens if the mixture is too hot or if you added too much marshmallow relative to the cereal. Let it cool for a minute or two before shaping. If it’s still too sticky, you can add a bit more cereal to the pot and mix it in. Also, greasing your hands with butter or cooking spray will make shaping much easier.
Can I make these ahead of time for a party?
Yes, you can make them up to 2 days in advance. Store them in an airtight container at room temperature. I recommend making them the night before the party so they have plenty of time to set fully. They will still be fresh and delicious.
How do I keep the pretzel sticks from breaking when I dip them?
This is a common issue. The key is to be gentle. Don’t try to force the pretzel into the mixture. Instead, use your fingers to press the marshmallow-cereal coating around the end of the pretzel. If your pretzel sticks are very thin, you can also try using thicker pretzel rods for a sturdier broomstick.
Can I use chocolate instead of candy melts for the decoration?
Definitely. Dark, milk, or white chocolate all work beautifully. Just melt it gently in a double boiler or microwave in 30-second bursts, stirring in between. Be careful not to overheat it, or it will seize up. Drizzle it over the set broomsticks for a beautiful finish.
Pin This Recipe!

Easy No-Bake Halloween Rice Krispie Broomsticks: Best Treats

These no-bake Halloween broomsticks combine salty pretzel sticks with sweet marshmallow and crunchy Rice Krispies cereal for a fun, kid-friendly treat that’s perfect for parties. Quick to make with simple pantry ingredients, they’re a happy accident turned tradition.
- Prep Time: 20 minutes
- Cook Time: 10 minutes
- Total Time: 30 minutes
- Yield: 30-36 broomsticks 1x
- Category: Dessert
- Cuisine: American
Ingredients
- 3 tablespoons unsalted butter
- 1 package (10 ounces) regular marshmallows (about 40 large marshmallows)
- 6 cups Rice Krispies cereal
- 30 to 36 pretzel sticks
- Optional: 1/4 cup candy melts or chocolate chips
- Optional: Green or black licorice strings
Instructions
- Line a large baking sheet with wax paper or parchment paper. Have pretzel sticks ready.
- In a large saucepan, melt 3 tablespoons unsalted butter over medium-low heat, stirring occasionally, until fully melted (2-3 minutes).
- Add the entire package of marshmallows to the melted butter. Stir constantly until completely melted and smooth (5-7 minutes).
- Remove from heat and let cool for 1-2 minutes.
- Pour 6 cups Rice Krispies cereal into the pot. Fold gently with a spatula until evenly coated, being careful not to crush the cereal.
- Take a pretzel stick and dip one end into the marshmallow-cereal mixture. Use fingers to gently press the mixture around the end, forming a broom-like shape about 1 to 1.5 inches long. Place on prepared baking sheet. Repeat with remaining pretzels and mixture (makes 30-36 broomsticks).
- Let broomsticks set at room temperature for about 30 minutes until firm.
- Optional: Melt candy melts or chocolate according to package directions. Dip the bristle end in melted chocolate or tie small pieces of licorice string around the broomstick. Let decorations set for 10 minutes.
Notes
Let the marshmallow mixture cool for 1-2 minutes before adding cereal to prevent sogginess. Lightly grease hands with butter or cooking spray to prevent sticking when shaping. If mixture gets too hard, reheat gently over low heat for 30 seconds. Store in an airtight container at room temperature for up to 5 days; do not refrigerate. Can be frozen for up to 2 months.
Nutrition
- Serving Size: 1 broomstick
- Calories: 95
- Sugar: 9
- Sodium: 110
- Fat: 2.5
- Saturated Fat: 1.5
- Carbohydrates: 18
- Protein: 1
Keywords: Halloween treats, no-bake, Rice Krispie treats, broomsticks, pretzel sticks, easy dessert, kid-friendly, party food